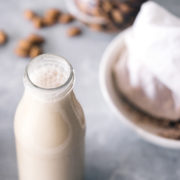
If you like almond milk as much as I do, why not try make it with your own almonds at home? It’s simple to do and you can control the quality of the milk. Here a simple tutorial on how to make almond milk at home.
But first, did you know that almond milk has been consumed since the Middle Ages? While almond milk has emerged to become one of our favourite plant milks, it was a staple in the medieval kitchen, as it keeps longer than cow’s milk (and it’s better for the health, too).
Nowadays you can find almond milk almost everywhere. However, most of the brands you see at the stores contain such a small quantity of almonds that you’re essentially paying for water and thickener. According to Choice, the most common content is 2.5% almond, which is equivalent to 2-3 almond kernels in 100 millilitres of almond milk. Shocking, isn’t it? This is why I never buy almond milk at the shop, unless I can find Inside Out Nutritious Goods, which contains 12% almonds. You pay a bit more, yes, but you’ll get better quality almond milk.
But if you have a bit of time, making your own almond milk is very fulfilling, not to mention tasty. Seriously, home made, fresh, almond milk. There’s nothing like it.
How to make almond milk at home
It involves three basic steps. Firstly you need to do is to soak the almonds in water overnight (you can also refrigerate them for about two or three days in the fridge to give yourself more time). After that you need to drain and rinse the almonds and then blend them with water. The resulting liquid, once you squeeze out every drop from the blended almond mixture, is fresh almond milk. It only lasts around three days in the fridge, because it’s raw and unpasteurised, so make just enough to keep you going for a few days.
4 cups water, plus more for soaking
A pinch of sea salt
A few drops of vanilla extract
Equipment
Nut bag or cheese cloth
A good blender
Two clean 500ml glass bottles
Instructions
Place almonds in a large bowl and cover with about two cm of water (I use a large measuring cup to save on washing up). Cover and let stand on the kitchen bench overnight, or refrigerate for up to two days. The longer the almonds soak, the creamier the almond milk.
Drain and rinse the soaked almonds (they should look big and plump). Transfer the almonds into the blender and add the water.
Blend for one to two minutes until you get a smooth almond mixture.
Line a large measuring cup with a nut bag or cheese cloth. Wash your hands.
Pour the almond mixture into the bag or the cloth and the squeeze and press to extract as much almond milk as possible. Transfer into the clean glass bottles.
Add sea salt and vanilla extract to flavour the almond milk. See notes for making other flavours. Store the in the fridge for up to three days.
Chocolate Flavour
500 ml fresh coconut milk
1 tsp cacao powder
1 tsp cinnamon
1 tbsp coconut sugar
Caramel Flavour
500 ml fresh coconut milk
1 tsp lucuma powder
1 tsp mesquite powder
1 tbsp coconut sugar
What to do with the leftover almond meal:
You can use the leftover almond meal to add to smoothies, oat porridge, muffins or other baked goods. I keep mine flattened in a ziplock bag in the freezer and just break off a piece each time I need it.
DID YOU MAKE THIS RECIPE?
Please let me know how it turned out for you! Leave a comment below and/or share a picture on Instagram and tag me in the picture.
Keren x
https://www.passionatelykeren.com.au/wp-content/uploads/2017/01/Almond-Milk-2.jpg20481365Kerenhttp://www.passionatelykeren.com.au/wp-content/uploads/2017/07/KN_LOGO_C-W-copy1.pngKeren2017-01-28 09:08:142017-02-10 13:08:47How To Make Almond Milk
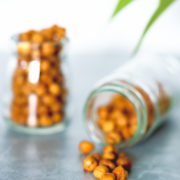
Roasted chickpeas! These are one of my favourite snacks. If you like crunchy, spicy things like me, you will love these!
They’re very easy to make and will stay crispy for up to two weeks in an air-tight container.
When I first made these, they didn’t become as crispy as I’d wanted them to be. After some trials and error I finally nailed the process that gives me crispy chickpeas every time.
How to make crispy roasted chickpeas
1. Dry the chickpeas as much as you can
The drier the chickpeas, the crunchier they get. Use a kitchen towel or paper towel to gently pat them dry.
2. Don’t skimp the oil
Rule of thumb is 1 measured tablespoon (30ml) for one can of chickpeas or 1 ½ cup of cooked chickpeas, if you use dried chickpeas. Any less and the chickpeas won’t be as crispy.
Why I love chickpeas (and why you should too)
There are so many great things about chickpeas: They are rich in complex carbohydrates, protein, and dietary fibre. They are low in fat and contain no cholesterol. Chickpeas are also a good source of potassium, vitamin A, calcium, vitamin C, iron, sodium, vitamin B-6 and magnesium.
They help with the management of blood sugar and lipids, promoting bone health, a hearty heart and lowering of blood pressure. They contain selenium, a mineral that is not present in most fruits and vegetables, which helps detoxify some cancer-causing compounds, prevents inflammation and also decreases tumor growth rates.
Canned or Dried
There is little difference in the nutritional value between canned chickpeas and dried chickpeas which you cook yourself. Though I personally like cooking my own chickpeas, as I find the canned ones are too soft for my taste, there’s nothing wrong with canned chickpeas (just make sure they’re BPA free). In fact, I always make sure have a few cans in the pantry so that I’m never too far from a quick, nutritious meal (or make roasted chickpeas for a delicious crisp snack).
Spicy Roasted Chickpeas
Crunchy, healthy, high-protein snack that is as delicious as it is addictive
2 cans chickpeas (drained and rinsed (about 3 cups))
2 tablespoons olive oil
1 teaspoon ground cumin
1 teaspoon garlic powder
1 teaspoon cayenne pepper
1/2 teaspoon sea salt
Heat the oven to 200°C and arrange a rack in the middle.
Pat dry chickpeas with paper towel. Place the chickpeas in a large bowl.
Add all the remaining ingredients. Toss until evenly coated. Taste and add more salt or cayenne pepper to make it more salty or spicy.
Spread the chickpeas in an even layer on a pan lined with baking paper and bake until crunchy, between 40 – 50 minutes, stirring halfway through.
DID YOU MAKE THIS RECIPE?
Please let me know how it turned out for you! Leave a comment below and/or share a picture on Instagram and tag me in the picture.
Shopping for groceries can be a bit time consuming. As for me, I often go without any plan and would end up buying things I don’t need in spur of the moment! Fortunately, a few weeks ago I had the opportunity to try the new Aussie Farmers Direct WW Freshbox – a delivery box of fresh produce and all the ingredients you need to prepare a healthy meal according to the Weight Watchers-friendly recipes included with the box. It has helped me see the benefit of meal planning and realise how much time I actually spend shopping for groceries every week. A lot!
They currently don’t have a vegan subscription box :( so I tried their vegetarian box. Since my boyfriend Nat is mostly vegetarian, the vegetarian box worked well for both of us. Nat is probably 80% vegan, 10% vegetarian, 9% pescatarian and 1% flexitarian (generally when under duress at certain family dinner events). I think he’s doing very well all things considered. So far we’ve kept our kitchen meat-free and I’m very pleased with that.
My Experience
When the box came I was pleasantly surprised by how much fresh produce it contained. Fresh vegetables, herbs, spices and grains took up about 80% of the box’s contents. The remainder was half a dozen of eggs, a small packet of Parmesan cheese and a few mini-cartons of long life dairy cream. I picked up the box from the front of the apartment around 9 am. They dropped the box very early in the morning, around 3 am or so, But everything was still cool and fresh thanks to the well-insulated box and cool-packs inside.
The box came with three recipe cards. I honestly didn’t think I’d actually use them. I hardly use recipes when cooking and I often like to wing it as I go. I was even thinking that it could be a fun mystery box challenge. However, as soon as I looked at some of the recipes, I just had to try them. They looked so sumptuous and simple and since I had got all the ingredients already, it was a no brainer. They also are easily veganised, which was a huge plus.
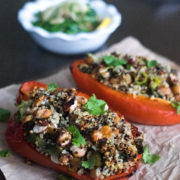
Stuffed Capsicums with Rocket and Fennel Salad (recipe at the bottom of this post)
Sweet potato dahl
YUM! They were absolutely delicious and easy to make. I really liked the stuffed capsicum – the top layer of quinoa stuffing becomes crunchy after baking which adds a nice texture to the overall dish. I got a bit excited that I made the sweet potato dahl while waiting for the capsicum to cook. It was a feast!
PROS and CONS
I never really got into the whole food subscription trend but now that I’ve tried it myself, I can definitely see the benefits. The problem with home cooking is that even if you enjoy cooking, sometimes you don’t have time to do grocery shopping or meal planning. Services like the Aussie Farmers Direct WW Freshbox help alleviate the stress of finding something new to cook and the hassle of grocery shopping. It’s also quite affordable. For the box I tried (three meals for two people each), it cost $64 per box, so it works out to $10.67 per plate. Not bad, considering the amount of time you save not having to think about what’s for dinner, or going grocery shopping. It’s also considerable cheaper than eating out (not to mention healthier).
There are a few inherent risks associated any food subscription service:
You need your house/unit secure enough to allow your subscription box to be left attended outside your door for a few hours. I had no problem with the first deliveries but this is definitely something that you’d need to consider. In saying that, because the delivery time is ridiculously early (around 3 am), the chance of it being stolen between 3 am and, say, 7 am, is fairly low if you’re in a secure building.
Product deterioration due to heat. There’s a risk of having the fresh produce deteriorating due to the heat, especially in the hot summer days we’re having nowadays. The coolpacks and the well-built cardboard box can keep the produce cool for a few hours but no more than that. To avoid deteroriation you will need to remember to take your box inside and move the fresh ingredients into the fridge as soon as you can.
Product damage from shipping and handling. A small risk but a risk nonetheless. The box is very well built and ingredients are packed securely inside. However, there’s a chance that one of the eggs might break (in fact, one did in my first box) during delivery – in which case, the cost would be refunded to the customer. It wasn’t a biggie for me since I don’t eat eggs. More reason to have vegan box, perhaps?
Final words
Overall, my experience with the WW Freshbox and their support team has been pleasant! I was surprised how much time I’ve saved – enough for a couple of yoga sessions (or perhaps a few extra episodes of Breaking Bad!).
Recipes
Here are a couple of recipes adapted from the WW Freshbox Vegetarian Recipes. Check out Aussie Farmers Direct for more info on their WW Freshbox. They also have other products such as the Fruit & Veg Box – pre-packaged fresh fruits and vegetables which are also available in an organic range. All of their products are ethically and sustainably sourced from local Australian growers so you know that your money goes toward supporting your fellow Australians.
Stuffed capsicums with rocket & fennel salad
A healthy hearty meal perfect for any day of the week. Adapted from WW Freshbox Recipe. The quinoa filling yield a crunchy top after baking making it even more delightful to eat.
Stuffed Capsicum
½ cup 100g quinoa
1 tbsp olive oil
3 green shallots (sliced)
2 garlic cloves (crushed)
1 tsp finely chopped fresh thyme (plus extra to garnish)
400 g can four bean mix (rinsed and drained)
40 g raw almonds (chopped)
4 800g red capsicums
Salad
1 fennel bulb (thinly sliced)
60 g baby rocket
30 g vegan parmesan (optional)
2 tsp red wine vinegar
1 ½ tsp extra virgin olive oil
¼ cup slivered almond
Preheat oven to 200°C. Line a large baking tray with baking paper.
Rinse and drain quinoa. Cook in a large saucepan of boiling water for 12 minutes or until tender. Drain under cold water then transfer to a large mixing bowl.
Meanwhile, heat half the oil in a medium non-stick frying pan on medium. Add shallot and garlic and cook, stirring, for 1 minute or until softened. Add to quinoa with thyme, four bean mix and almonds. Season and toss to combine.
Cut capsicum in half lengthways and remove seeds and membrane. Fill with quinoa mixture. Place on the lined baking tray and cover loosely with foil. Bake for 30 minutes or until capsicum is tender. Uncover and cook for another 10 minutes or until golden.
To make the salad: Combine fennel, rocket and parmesan in a bowl. Drizzle with vinegar and remaining oil.
Sweet Potato Dahl
Recipe Type: Main
Author: Keren
Prep time:
Cook time:
Total time:
Serves: 4
A warm and comforting meal that is simple to make, yet hearty and delicious. The best thing is, you only need one pot to make it. Adapted from [url href=”https://www.weightwatchers.com/au/healthy-recipes/sweet-potato-dhal”]WW Freshbox Vegetarian Recipe[/url].
Ingredients
1 cup (200g) dried red lentils, rinsed, drained
300g sweet potato, cut into 2 cm pieces
3 cups water
1 vine-ripened tomato, chopped
1 tbsp coconut oil
1 brown onion, finely chopped
3 garlic cloves, crushed
2 tsp finely grated fresh ginger
1 fresh red chilli, finely chopped
2 tsp ground cumin
¼ cup chopped fresh coriander leaves, plus extra to garnish
Instructions
Heat coconut oil in a large pan over medium heat. Add onion. Stir for 5 minutes or until translucent. Add garlic, ginger, chilli, cumin and stir for 1 minute or until fragrant.
Place lentils, sweet potato, tomato and water. Bring to the boil.
Reduce the heat and simmer, stirring occasionally, for about 20 minutes or until lentils are tender and mixture is thick.
Stir in chopped coriander. Season with salt and pepper.
Serve with extra coriander.
3.5.3226
Have you used any food subscription services before? What do you think?
https://www.passionatelykeren.com.au/wp-content/uploads/2017/01/Stuffed-capsicum-with-quinoa.jpg20481536Kerenhttp://www.passionatelykeren.com.au/wp-content/uploads/2017/07/KN_LOGO_C-W-copy1.pngKeren2017-01-12 05:00:342018-08-04 15:33:09Review: Aussie Farmers Direct WW Freshbox
Happy New Year, everybody! It’s good to be back blogging again. Even though I only missed last week’s blogpost schedule, it feels like ages since I shared a recipe. I hope this vegan carrot cupcakes makes up for it, though; as they’re really good!
It’s been rather a crazy few weeks as I moved house during the Christmas/New Year break. I’ve survived the ordeal, much like a survivor of a plane crash (except I now have to make the crash site somewhat livable). It’s getting there… slowly.
Our kitchen is being ripped out next Monday and so I will have to find a temporary place to cook and clean. Between you and me, I think it is going to be the laundry. I really don’t know what to expect during the renovation except that it’s going to be a hectic few weeks and I won’t have a proper kitchen for around four weeks (which is a pretty big deal).
Nevertheless, despite the inconvenience of having my ‘creative space’ being torn asunder, I thought it would be a perfect opportunity for me to go through some of my draft posts and recipes from 2015 – 2016 which I had planned on publishing one day. Well… that day has come. I declare this year to be my year of backlog clearing, goal kicking, and extreme productivity. *Fist pump*
And so let’s kick off 2017 with this lovely recipe: delectable vegan carrot cupcakes, which has been adapted from my old and trusted carrot cake recipe I used for a number of years before I became vegan. It was really easy to ‘veganise’ the recipe. Butter was replaced with coconut oil, chicken egg with egg replacer, baking soda and vinegar for instant leavening action, and poof… you get soft and moist cupcakes that will make your mother proud. Isn’t science wonderful?
I’m sharing two methods today: Manual method and the Cuisine Companion method which can be adapted for the Thermomix. I normally use the manual method for most of my cakes, but when it comes to grating carrots and chopping nuts, I can get a little bit lazy. This is where my CC earns its keep – grating, chopping, and mixing my ingredients all in one bowl. You can also use a normal food processor for the chopping and grating if you wish, but there’s also nothing wrong with a bit of elbow grease.
Here’s to an amazing 2017!
Vegan Carrot Cupcakes
Wet Bowl
2 medium sized carrots (200g peeled and finely grated)
1 cup walnuts (finely chopped)
1 cup raisins
4 tsp egg replacer (I use <a href="http://www.orgran.com/products_/">Orgran Egg Replacer</a>)
6 tablespoons of water
1 tablespoon apple cider vinegar
2/3 cup refined coconut oil (melted)
1/2 cup sugar
Dry Bowl
1 1/3 cups plain flour
1 1/2 tsps baking soda
1 tsp baking powder
1/2 tsp ground cinnamon
1/2 tsp ground nutmeg
1/2 tsp ground allspice
1/2 tsp salt
Coyo Frosting
½ cup coconut yogurt
2 tsps maple syrup
Manual Method:
Preheat the oven to 180 C. Line a mini muffin pan with paper cups or spray with oil.
Prepare your wet bowl mixture. Whip together egg replacer with 6 tablespoons of water until it’s thick and creamy. Add oil and blend until combined. Transfer to a big bowl.
Add carrots, walnuts, raisins and sugar. Stir to combine.
Sift flour, sugar, baking soda, baking powder, spices and salt together in a large bowl.
Add the wet mixture to the dry mixture and stir until just combined. Don’t overmix.
Pour batter into the prepared mini muffin cups until 2/3’s full.
Bake cupcakes in the preheated oven until a toothpick inserted into the middle of a cupcake comes out clean, about 12 minutes.
Set aside to cool completely. Serve with some Coyo frosting if desired.
Cuisine Companion Method:
Preheat the oven to 180 C. Line a mini muffin pan with paper cups or spray with oil.
Chop carrots using Superblade using speed 10, 1 minute.
Add 1 cup walnuts, chop at speed 7, 20 seconds.
Add 1 cup mixed fruits, mix at speed 7, 10 seconds.
Add flour, spices and salt.
Whisk together egg replacer and water until it’s thick and creamy.
Add wet ingredients to dry ingredients and mix at speed 9, 20 seconds.
Pour batter into the prepared mini muffin cups until 2/3’s full.
Bake cupcakes in the preheated oven until a toothpick inserted into the middle of a cupcake comes out clean, about 12 minutes.
Set aside to cool completely. Serve with some Coyo frosting if desired.
Note: If you’re using Cuisine Companion, you don’t have to grate the carrots or chop the walnuts.
DID YOU MAKE THIS RECIPE?
Please let me know how it turned out for you! Leave a comment below and/or share a picture on Instagram and tag me in the picture.
 If you like almond milk as much as I do, why not try make it with your own almonds at home? It’s simple to do and you can control the quality of the milk. Here a simple tutorial on how to make almond milk at home.