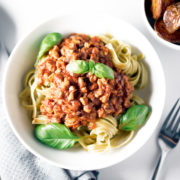
Tempe Bolognese

Yes, you can make bolognese without meat. This Tempe Bolognese is my healthy, plant-based twist to the old family favourite. It’s simple to make, delicious and satisfying.

If you didn’t grow up eating tempe (or tempeh), you may not be familiar with its strong taste. Tempe has an earthy fermented aroma, kind of like cheese, and has a chewy, almost meaty texture. Back home in Indonesia there are only two kinds of popular tempe dishes: deep fried tempe, or stir fried tempe with traditional herbs and spices. One is salty, and the other one is sweet. That’s it.

It wasn’t until I become vegan that I started experimenting with tempe. Turns out that there are so many meat dishes which you can duplicate with tempe, including pasta dishes such as bolognese.

The secret to making this bolognaise work is to pan sauté the tempe cubes so that it has a firmer texture which will hold their shape once the sauce is added.

I also added a bit of cayenne pepper to give the tempe bolognese sauce a nice spicy hit. I think the pepper adds extra depth to the flavour of the sauce. That said, if you are allergic to chilli, like my boyfriend, you can definitely omit using the pepper or swap it with something milder like ground paprika.

Tempe Bolognese

Ingredients:

  • 1 packet of tempeh (350gram), sliced into small cubes
  • 1 packet (375g) dried spaghetti or fettuccine (I use spinach fettuccine by San Remo)
  • 1 can (400g) of peeled tomato
  • 1 large onion diced
  • 5 garlic cloves, sliced
  • 4 tbsp. olive oil
  • ¾ cup (170g) tomato paste
  • ½ cup of water
  • 1 tsp. sugar
  • ½ tsp. dried oregano
  • ¼ tsp. salt
  • Salt and pepper
  • Fresh basil leaves
  • ¼ tsp cayenne pepper (optional)
  • Vegan Parmesan (optional)

Method:

  1. Heat 2 tbsp. oil in a saucepan over medium-high heat. Add onion and garlic and cook, stirring, for 2-3 minutes until fragrant. Add another 2 tbsp of oil and diced tempe cubes. Cook, stirring with a wooden spoon to break up any lumps for 3 minutes or until golden brown.
  2. Add the tomato sauce and bring to the boil. Reduce heat to medium and simmer for 30 minutes, stirring occasionally until sauce thickens. Taste and season with salt and pepper.
  3. Meanwhile, cook the pasta following packet directions until al dente. Drain.
  4. Divide the pasta among bowls and spoon over bolognese sauce. Serve with some fresh basil and a sprinkle of vegan parmesan.

Tip: Replace peeled tomato and tomato paste with your favourite marinara pasta sauce to save time.

DID YOU MAKE THIS RECIPE?

Please let me know how it turned out for you! Leave a comment below and/or share a picture on Instagram and tag me in the picture. I’d love to see your creation.

Keren x

Almond Milk

How To Make Almond Milk

If you like almond milk as much as I do, why not try make it with your own almonds at home? It’s simple to do and you can control the quality of the milk. Here a simple tutorial on how to make almond milk at home.

But first, did you know that almond milk has been consumed since the Middle Ages? While almond milk has emerged to become one of our favourite plant milks, it was a staple in the medieval kitchen, as it keeps longer than cow’s milk (and it’s better for the health, too).

Nowadays you can find almond milk almost everywhere. However, most of the brands you see at the stores contain such a small quantity of almonds that you’re essentially paying for water and thickener. According to Choice, the most common content is 2.5% almond, which is equivalent to 2-3 almond kernels in 100 millilitres of almond milk. Shocking, isn’t it? This is why I never buy almond milk at the shop, unless I can find Inside Out Nutritious Goods, which contains 12% almonds. You pay a bit more, yes, but you’ll get better quality almond milk.

But if you have a bit of time, making your own almond milk is very fulfilling, not to mention tasty. Seriously, home made, fresh, almond milk. There’s nothing like it.

How to make almond milk at home

It involves three basic steps. Firstly you need to do is to soak the almonds in water overnight (you can also refrigerate them for about two or three days in the fridge to give yourself more time). After that you need to drain and rinse the almonds and then blend them with water. The resulting liquid, once you squeeze out every drop from the blended almond mixture, is fresh almond milk. It only lasts around three days in the fridge, because it’s raw and unpasteurised, so make just enough to keep you going for a few days.

[embedyt] http://www.youtube.com/watch?v=Qml7Tg1PBDs&width=1500&height=873[/embedyt]

[embedyt] http://www.youtube.com/watch?v=io_nYtOZ5Zg&width=1500&height=873[/embedyt]

How To Make Almond Milk

Ingredients

  • 1 1/2 cup raw almonds
  • 4 cups water, plus more for soaking
    A pinch of sea salt
  • A few drops of vanilla extract

Equipment

  • Nut bag or cheese cloth
  • A good blender
  • Two clean 500ml glass bottles

Instructions

  1. Place almonds in a large bowl and cover with about two cm of water (I use a large measuring cup to save on washing up). Cover and let stand on the kitchen bench overnight, or refrigerate for up to two days. The longer the almonds soak, the creamier the almond milk.
  2. Drain and rinse the soaked almonds (they should look big and plump). Transfer the almonds into the blender and add the water.
  3. Blend for one to two minutes until you get a smooth almond mixture.
  4. Line a large measuring cup with a nut bag or cheese cloth. Wash your hands.
  5. Pour the almond mixture into the bag or the cloth and the squeeze and press to extract as much almond milk as possible. Transfer into the clean glass bottles.
  6. Add sea salt and vanilla extract to flavour the almond milk. See notes for making other flavours. Store the in the fridge for up to three days. 

Chocolate Flavour

  • 500 ml fresh coconut milk
  • 1 tsp cacao powder
  • 1 tsp cinnamon
  • 1 tbsp coconut sugar

Caramel Flavour

  • 500 ml fresh coconut milk
  • 1 tsp lucuma powder
  • 1 tsp mesquite powder
  • 1 tbsp coconut sugar


What to do with the leftover almond meal:

You can use the leftover almond meal to add to smoothies, oat porridge, muffins or other baked goods. I keep mine flattened in a ziplock bag in the freezer and just break off a piece each time I need it.

DID YOU MAKE THIS RECIPE?

Please let me know how it turned out for you! Leave a comment below and/or share a picture on Instagram and tag me in the picture.

Keren x

Spicy Roasted Chickpeas

Roasted chickpeas! These are one of my favourite snacks. If you like crunchy, spicy things like me, you will love these!

They’re very easy to make and will stay crispy for up to two weeks in an air-tight container.

When I first made these, they didn’t become as crispy as I’d wanted them to be. After some trials and error I finally nailed the process that gives me crispy chickpeas every time.

How to make crispy roasted chickpeas 

1. Dry the chickpeas as much as you can

The drier the chickpeas, the crunchier they get. Use a kitchen towel or paper towel to gently pat them dry.

2. Don’t skimp the oil

Rule of thumb is 1 measured tablespoon (30ml) for one can of chickpeas or 1 ½ cup of cooked chickpeas, if you use dried chickpeas. Any less and the chickpeas won’t be as crispy.

Why I love chickpeas (and why you should too)

There are so many great things about chickpeas: They are rich in complex carbohydrates, protein, and dietary fibre. They are low in fat and contain no cholesterol. Chickpeas are also a good source of potassium, vitamin A, calcium, vitamin C, iron, sodium, vitamin B-6 and magnesium.

They help with the management of blood sugar and lipids, promoting bone health, a hearty heart and lowering of blood pressure. They contain selenium, a mineral that is not present in most fruits and vegetables, which helps detoxify some cancer-causing compounds, prevents inflammation and also decreases tumor growth rates.

Canned or Dried

There is little difference in the nutritional value between canned chickpeas and dried chickpeas which you cook yourself. Though I personally like cooking my own chickpeas, as I find the canned ones are too soft for my taste, there’s nothing wrong with canned chickpeas (just make sure they’re BPA free). In fact, I always make sure have a few cans in the pantry so that I’m never too far from a quick, nutritious meal (or make roasted chickpeas for a delicious crisp snack).


Spicy Roasted Chickpeas

Crunchy, healthy, high-protein snack that is as delicious as it is addictive

  • 2 cans chickpeas (drained and rinsed (about 3 cups))
  • 2 tablespoons olive oil
  • 1 teaspoon ground cumin
  • 1 teaspoon garlic powder
  • 1 teaspoon cayenne pepper
  • 1/2 teaspoon sea salt
  1. Heat the oven to 200°C and arrange a rack in the middle.
  2. Pat dry chickpeas with paper towel. Place the chickpeas in a large bowl.
  3. Add all the remaining ingredients. Toss until evenly coated. Taste and add more salt or cayenne pepper to make it more salty or spicy.
  4. Spread the chickpeas in an even layer on a pan lined with baking paper and bake until crunchy, between 40 – 50 minutes, stirring halfway through.

DID YOU MAKE THIS RECIPE?

Please let me know how it turned out for you! Leave a comment below and/or share a picture on Instagram and tag me in the picture.

Keren x

References:

http://www.medicalnewstoday.com/articles/280244.php

http://www.whfoods.com/genpage.php?tname=foodspice&dbid=58


Vegan Carrot Cupcakes

Happy New Year, everybody! It’s good to be back blogging again. Even though I only missed last week’s blogpost schedule, it feels like ages since I shared a recipe. I hope this vegan carrot cupcakes makes up for it, though; as they’re really good!

It’s been rather a crazy few weeks as I moved house during the Christmas/New Year break. I’ve survived the ordeal, much like a survivor of a plane crash (except I now have to make the crash site somewhat livable). It’s getting there… slowly.

Our kitchen is being ripped out next Monday and so I will have to find a temporary place to cook and clean. Between you and me, I think it is going to be the laundry. I really don’t know what to expect during the renovation except that it’s going to be a hectic few weeks and I won’t have a proper kitchen for around four weeks (which is a pretty big deal).

Nevertheless, despite the inconvenience of having my ‘creative space’ being torn asunder, I thought it would be a perfect opportunity for me to go through some of my draft posts and recipes from 2015 – 2016 which I had planned on publishing one day. Well… that day has come. I declare this year to be my year of backlog clearing, goal kicking, and extreme productivity. *Fist pump*

And so let’s kick off 2017 with this lovely recipe: delectable vegan carrot cupcakes, which has been adapted from my old and trusted carrot cake recipe I used for a number of years before I became vegan. It was really easy to ‘veganise’ the recipe. Butter was replaced with coconut oil, chicken egg with egg replacer, baking soda and vinegar for instant leavening action, and poof… you get soft and moist cupcakes that will make your mother proud. Isn’t science wonderful?

I’m sharing two methods today: Manual method and the Cuisine Companion method which can be adapted for the Thermomix. I normally use the manual method for most of my cakes, but when it comes to grating carrots and chopping nuts, I can get a little bit lazy. This is where my CC earns its keep – grating, chopping, and mixing my ingredients all in one bowl. You can also use a normal food processor for the chopping and grating if you wish, but there’s also nothing wrong with a bit of elbow grease.

Here’s to an amazing 2017!

Vegan Carrot Cupcakes

Wet Bowl

  • 2 medium sized carrots (200g peeled and finely grated)
  • 1 cup walnuts (finely chopped)
  • 1 cup raisins
  • 4 tsp egg replacer (I use <a href="http://www.orgran.com/products_/">Orgran Egg Replacer</a>)
  • 6 tablespoons of water
  • 1 tablespoon apple cider vinegar
  • 2/3 cup refined coconut oil (melted)
  • 1/2 cup sugar

Dry Bowl

  • 1 1/3 cups plain flour
  • 1 1/2 tsps baking soda
  • 1 tsp baking powder
  • 1/2 tsp ground cinnamon
  • 1/2 tsp ground nutmeg
  • 1/2 tsp ground allspice
  • 1/2 tsp salt

Coyo Frosting

  • ½ cup coconut yogurt
  • 2 tsps maple syrup

Manual Method:

  1. Preheat the oven to 180 C. Line a mini muffin pan with paper cups or spray with oil.
  2. Prepare your wet bowl mixture. Whip together egg replacer with 6 tablespoons of water until it’s thick and creamy. Add oil and blend until combined. Transfer to a big bowl.
  3. Add carrots, walnuts, raisins and sugar. Stir to combine.
  4. Sift flour, sugar, baking soda, baking powder, spices and salt together in a large bowl.
  5. Add the wet mixture to the dry mixture and stir until just combined. Don’t overmix.
  6. Pour batter into the prepared mini muffin cups until 2/3’s full.
  7. Bake cupcakes in the preheated oven until a toothpick inserted into the middle of a cupcake comes out clean, about 12 minutes.
  8. Set aside to cool completely. Serve with some Coyo frosting if desired.

Cuisine Companion Method:

  1. Preheat the oven to 180 C. Line a mini muffin pan with paper cups or spray with oil.
  2. Chop carrots using Superblade using speed 10, 1 minute.
  3. Add 1 cup walnuts, chop at speed 7, 20 seconds.
  4. Add 1 cup mixed fruits, mix at speed 7, 10 seconds.
  5. Add flour, spices and salt.
  6. Whisk together egg replacer and water until it’s thick and creamy.
  7. Add wet ingredients to dry ingredients and mix at speed 9, 20 seconds.
  8. Pour batter into the prepared mini muffin cups until 2/3’s full.
  9. Bake cupcakes in the preheated oven until a toothpick inserted into the middle of a cupcake comes out clean, about 12 minutes.
  10. Set aside to cool completely. Serve with some Coyo frosting if desired.

Note: If you’re using Cuisine Companion, you don’t have to grate the carrots or chop the walnuts.

DID YOU MAKE THIS RECIPE?

Please let me know how it turned out for you! Leave a comment below and/or share a picture on Instagram and tag me in the picture.

Keren x

Ginger Bread Donuts

Hey guys… guess what. I made some ginger bread donuts for Christmas. And yes… I’m not the world’s best glazer, so excuse the messy glaze.

But they are delicious!

If you haven’t noticed already, baked donuts are my latest obsession. Any excuse to make them and experiment with different flavours.

If you know me well, I don’t normally glaze my donuts. I’m just not very good at glazing and I’m too impatient for the task. But since it’s Christmas, I’m making a special effort to glaze. Not with your typical sugary glaze though – I just couldn’t bring myself to dip these beauties into a bowl full of icing sugar. Can you guess what I use instead?

How about coconut yogurt mixture! Yep, these ginger bread donuts are covered in creamy, delicious coyo glazing. An unusual combination which amazingly…works! The richness and the slight tartness of the coconut yogurt glaze gives a nice balance the sweetness of the donuts. Yum!

Ginger Bread Donuts

A delicious Christmas treats for everyone. Oil-free, refined sugar free, and can be easily made gluten-free.

Donut Batter

  • 2 cups plain flour (or gluten-free flour for gluten-free version)
  • 1 1/2 cups coconut cream
  • 1 cup soy milk
  • 1/2 cups coconut sugar
  • 1/2 tsp ginger
  • 1/2 tsp cloves
  • 2 tsp cinnamon
  • 1/2 tsp salt
  • 1 tsp baking powder
  • 1/2 tsp bicarb soda
  • 2 tbsp ACV

Coyo Glazing

  • 1/2 cup coconut yogurt
  • 1 tsp vanilla extract
  • 2 tsp maple syrup
  1. Preheat the oven to 180 C.
  2. In a large bowl, combine the dry ingredients with a whisk to mix thoroughly. Combine the wet ingredients in a small bowl.
  3. Mix wet ingredients to dry ingredient and then pipe mixture onto mini donut pan. Make sure to fill the pan only to 2/3 full.
  4. Bake for 10-12 min until a toothpick comes out clean. Allow to cool for couple of minutes, then transfer the donuts onto a cooling rack.
  5. Make the coyo glazing my mixing all the ingredients.


DID YOU MAKE THIS RECIPE?

Please let me know how it turned out for you! Leave a comment below and/or share a picture on Instagram and tag me in the picture.

Keren x

Pina Colada Nice Cream

Summer is coming and I can’t wait to start making cold desserts again!

And now that I am a proud owner of the Vitamix, I can make all sorts of delicious thick nice cream without worrying that my blender will break. The recipe I’m sharing today is Pina Colada Nice Cream. It’s like a healthier, non-alcoholic version of frozen Pina Colada. And it’s super delicious.

pinacolada-nice-cream-1Even though I absolutely adore my Vitamix, I still have a soft spot for my Breville blender. It’s been so reliable that I’m rather sad of the fact that I have to retire it. But I’m not throwing it away completely. I’m keeping it for other non-food hobby projects that require a blender (like making skincare products or candle wax).

Anyway, here’s a quick and easy nice-cream recipe, which you can make without using an ice-cream maker. You just need a blender. You don’t even need a power blender!

pinacolada-nice-cream-11

And if your blender is struggling, just add some extra water a little at a time to ‘help’ your blender process the frozen fruits.

It’s mildly sweet, rich, creamy and minty. Everything I like in an ice cream. It’s really good! I hope you try it.

Pina Colada Nice Cream

Pina Colada nice cream

  • 1 1/2 cup diced pineapple (freeze overnight)
  • ½ cup coconut water (I use <a href="https://rawc.com.au">rawc</a>)
  • ½ cup coconut milk
  • 3 sprigs of mint (about 20 leaves)
  1. Add all the ingredients into a blender.
  2. Blend.
  3. Garnish with some fresh mint leaves and serve immediately

pinacolada-nice-cream-3

Did you make this recipe?

Please let me know how it turned out for you! Leave a comment below or share a picture on Instagram and tag me so I can see your creation.

How to make vegan mayonaisse

You’re in for a treat. I’m going to show you how to make vegan mayonnaise.

When I first became a vegan I thought I would never be able to have mayonnaise again and that I would have to kiss aioli goodbye. And for a while, that was the case… until I came across some vegan mayonnaise brands at the Cruelty-free Shop, which contain no eggs, but taste just like a regular mayo, like this one and this one.

This discovery completely changed my life. My veggie burger became a lot more exciting and salads were transformed.

Best Vegan Burger

Problem is, these vegan mayonnaises can get a bit expensive at the store.

But it turns out that you can make egg-free mayonnaise at home, easily, using soymilk and oil. This is my go-to recipe for home-made mayo that is unbelievable good. It’s from the Miyoko Schinner cookbook – The Homemade Vegan Pantry (a must have if you want to level up your vegan cooking skills).

The secret to making delicious vegan mayo.

Firstly, you need kala namak – an Indian salt that lends an egg-y flavour to the mayonnaise. You can find it on Amazon, in health food stores or Indian grocery stores. It’s pinkish in colour and it’s a great ingredient to have if you want to lift your game in the vegan-cooking department.

Secondly, you need lecithin to aid the emulsification process. Here’s a bit of kitchen science for you: Mayonnaise is an emulsion (a mixture of two liquids that normally can’t be combined, such oil and water). In mayonnaise, emulsification is achieved by slowly adding oil into soymilk while the blender is running. This mixing process disperses and suspends tiny droplets of oil and milk throughout each other. In it’s normal form, the emulsion is unstable, which is why we have added lecithin. Lecithin is an emulsifier that helps holds the mixture together and prevents it from separating.

If it sounds a bit too much right now, don’t worry, once you start blending, everything will start to make sense.

vegan-mayonnaise

How to make vegan mayonnaise (Makes 1 jar)

Ingredients:

  • ½ cup soy milk
  • 1 tbsp English mustard
  • 1/2 tbsp apple cider vinegar
  • ½ tsp kala namak salt
  • 4 tsp lecithin granules
  • ½ tsp sugar optional
  • ½ – 1 ¼ cup canola oil

Instructions:

1. Add all ingredients except canola oil into a blender and blend on medium high speed.
2. Drizzle canola oil in a very thin stream while the blender is running until it becomes thick and creamy. It may take up to 4-5 minutes for this to happen (and it will happen suddenly) so you have to trust the process. Three words – ‘steady thin stream’.
3. Transfer to a clean glass jar and store in the fridge for up to a month.

Variation – Garlic Mayonnaise

Ingredients:

  • ¼ cup mayonnaise
  • 2 large garlic cloves, finely minced
  • 1 teaspoon fresh lemon juice
  • 3 tablespoons olive oil

Instructions:

  1. Blend all ingredients together

Did you make this recipe?

Please let me know how it turned out for you! Leave a comment below or share a picture on Instagram and tag me so I can see your creation.

Keren x

Mushroom Risotto with Black Truffles

Oh, those little black gold nuggets… A couple of months ago I impulse-purchased a couple of black truffles from The Truffle Farm because, well, (a) they were in season and (b) I’m weak around fine foods… like… completely helpless! So I made this dish –  Mushroom Risotto with Black Truffle.

Vegan Mushroom Risotto With Black Truffle

Mushroom risotto and black truffle is like the perfect marriage made in foodie heaven I think.

I got a bit nervous (like pretty much every time I make risotto). Did I add enough stock? Did I add too much stock? Is the flavour okay? Is it going to be soggy or too dry?

I just wanted it to be good.

Because..

I can’t live with a bad risotto – at least not from my kitchen.

Vegan Mushroom Risotto With Black Truffle

But it turned out beautiful! I don’t know why I worried so much. It was creamy, perfectly al-dente and the flavour of Swiss brown mushrooms…. man, it really made this dish shine. And the thinly shaved truffle… sprinkling it all over the dish was almost like making that crunchy caramel top of crème brulee, it made the dish perfect.

This dish is rich, comforting, and full of the earthy and savoury flavours that I adores so much. I also added a sprinkle of vegan parmesan, and just like that – magic happened.

mushroom-risotto-2

Making risotto requires patience. You have to stand there in the kitchen for almost an hour just stirring the thing. But I guess that’s why it tastes so good – because of all the love you put into it. I’m lucky enough to have a Cuisine Companion, a cooking machine that cooks and stirs at the same time, so I don’t have to go to so much trouble. But I’ve made risotto without it before and it wasn’t too bad, as long as your heart’s in it. Besides, that’s how people have made risotto for years – in a saucepan, over a stove.

Vegan Mushroom Risotto With Black Truffle

Mushroom Risotto with Black Truffles

Ingredients

  • 2 cups Arborio rice (I use SunRice brand)
  • 1 large brown onion, diced
  • 4 garlic cloves, diced
  • 200g Swiss brown mushroom, sliced to 1cm thickness
  • ¼ cup extra virgin oil
  • 1/3 cup white wine
  • 5 cups vegetable stock
  • ¼ cup vegan parmesan
  • 20 gram black truffles (or you can substitute with truffle oil)
  • 1 tablespoon vegan butter (I use Nuttelex)
  • 1 tsp salt
  • pepper

Cuisine Companion Method: 

  1. Place in the bowl fitted with the mixer. Add the oil and onion and launch the P1 slow cook program without the stopper for 3 mins.
  2. Add the rice then launch the P1 Slow Cook program without the stopper for 3 mins. Add white wine and relaunch for 1 min.
  3. Add the vegetable stock stock and launch the Slow Cook Program P2 at 95°C for 15 mins without the stopper.
  4. Meanwhile slice mushroom to 1cm thickness.
  5. Add mushroom at the end of the 15 minute program and then relaunch for 5 minutes.
  6. Add the vegan parmesan, salt, butter and gently mix. Adjust the seasoning.
  7. Sprinkle with shaved black truffle or drizzle with black truffle oil.

Manual Method:

  1. Place stock in a saucepan over medium heat. Cook until mixture starts to simmer. Turn the heat to low and cover to keep hot.
  2. Heat oil in a large heavy-based saucepan over medium-high heat. Add onion and cook for 3-5 minutes or until onion has softened.
  3. Stir in rice into the cooked onion. Cook, for 1 to 2 minutes or until coated. Add wine. Stir for 30 seconds or until wine has absorbed.
  4. Add ½ cup of hot stock to rice mixture. Cook, stirring, until stock has absorbed. Repeat with remaining stock, ½ cup at a time.
  5. Add sliced mushroom after adding the last cup of stock and cook until liquid has absorbed and rice is tender.
  6. Remove pan from heat. Stir in spinach, parmesan and butter. Set aside, covered, for 2 minutes. Season. Serve with grated parmesan.
  1. Add the vegan parmesan, salt, butter and gently mix. Adjust the seasoning.

Tips:

  • Infuse the rice with the black truffles for five days for a boost of truffle flavour.
  • You can shave truffles using a cheese shaver or a vegetable peeler.

Vegan Mushroom Risotto With Black Truffle

Did you make this recipe?

Please let me know how it turned out for you! Leave a comment below and/or share a picture on Instagram and tag me :)

Big love,

Keren

Flourless Vegan Chocolate Cookies

A couple days ago I attempted to make a vegan ‘brain’ lemon jelly for Halloween. It was an epic fail. L I’m not sure if it was the mould I was using, or the ingredients themselves. I used lots and lots of lemon juice, which may have interfered with the gelling nature of agar-agar. It just didn’t set! So I made these instead – charcoal, heart-shaped flourless vegan chocolate cookies. In hindsight I’m glad I failed the brain jelly experiment because this is, frankly, much better.

The cookie texture was almost wafer-like, with crunchy bits from the seeds and the gooey chocolate surprise here and there. They’re flourless, gluten-free, refined-sugar free (if you’re using sugar-free chocolate), and the best thing about them is they do taste like cookies!

These are not your typical Halloween treats but they look the part and, hey, you don’t come to my blog and expect the usual cookie recipes, do you?

flourless-vegan-chocolate-cookies-9-2

The secret ingredients + tips to making the perfect cookies

Instead of using flour we’ll be using our secret ingredient – black beans. You will need a whole can of black beans for this recipe but you can also use dried beans. If you’re using dried beans, you’ll need to make sure you cook them until they’re soft enough that you can squish a bean with your fingers without much effort.

Note that because I wanted to make my cookies as dark as possible for Halloween, I used Dutch pressed cocoa, black tahini and black sesame seeds. You can use normal cocoa powder, white tahini and sesame seeds if you wish. Or you could replace the tahini with peanut butter and use nuts or dried fruit instead of the sesame seeds. Get creative. You won’t break the recipe, I promise.

flourless-vegan-chocolate-cookies-21

I used a five-centimetre heart shaped cake cutter with a pressed lid, but you can also use the back of the spoon to flatten the dough. The thinner the cookies (less than 5mm), the crispier they will be. I recommend baking a test batch before committing to a particular thickness. I like mine a little bit soft so I made my cookies slightly thicker.

Another thing to consider is that these cookies won’t spread during baking so you can place them fairly close to each other and fit more on the one pan.

So are you ready to make healthy, protein-rich, flourless vegan chocolate cookies that are cool enough for Halloween, and taste great too?

You know you are!

flourless-vegan-chocolate-cookies-15-2


Flourless Vegan Chocolate Cookies

  • 1 can (400g of blackbean (or 1 ½ cup cooked beans), drain and rinse)
  • 1/3 cup Dutch pressed cocoa powder
  • 1/3 cup dark chocolate (finely chopped (I use Chocolate Counter))
  • 1/2 cup coconut sugar
  • 2 Tbsp. coconut butter or coconut oil
  • 2 Tbsp. black sesame seeds
  • 2 Tbsp. chia seeds
  • 1 Tbsp. black tahini
  • 3 Tbsp. water
  • 1 tsp. vanilla extract
1/3 cup chopped dark chocolate
  • ¼ tsp. sea salt (plus extra for sprinkling)
  1. Preheat oven to 180°. Line a baking sheet with non-stick baking paper.
  2. Mix chia seeds and 3 Tbsp water in a bowl and set aside for 5 minutes.
  3. Place beans, coconut butter, cocoa powder, sugar and salt in a food processor and blend until well combined. Transfer to a bowl.
  4. Add chopped chocolate and mix to combine.
  5. Spoon cookie batter onto the lined baking sheet (or cake presser). Flatten top of cookies slightly using the back of the spoon (aim for less than 5mm thickness). Note that they will not spread when baking.
  6. Sprinkle with extra sea salt. Bake for 15 minutes. Let cool on cooling rack and enjoy!

Did you make this recipe?

Please let me know how it turned out for you! Leave a comment below or share a picture on Instagram and tag me so I can see your creation.

Keren x

(Vegan) Blueberry Donuts – Halloween Edition

These (Vegan) Blueberry Donuts were actually a two-fold experiment: the first stage was to test if I could make blueberry donuts with fresh blueberries, and the second was to experiment with stop-motion technique to give the resulting video a bit of ‘magic’. Stop-motion is a technique which uses a lot of still frames with the object moving in small increments, creating the illusion of movement when the series of frames is played as a continuous sequence, like an animation.

So this recipe’s video incorporates a bit of wizardry (like summoning ingredients and baking with a blink of an eye), and I loved it, because, after all, who doesn’t love a touch of magic in the kitchen?

vegan blueberry donuts

Tips on making these vegan blueberry donuts

These donuts are based on my Lifechanging Donuts recipe. To make this version you just need to add 1/2 cup of blueberries to the batter.

Important note: to make sure the blueberries don’t stick to the bottom of the mould (I recommend using a silicon mould), be sure to cover the base of the silicon pan with the batter first (without blueberries) and then follow with some more batter with two or three blueberries. This will prevent the berries from sticking to the bottom of the mould which makes the donuts impossible to remove without breaking.

Alternatively, you can add the blueberries right at the end, when the mould has been filled with the batter (see picture below), so the blueberries are on surface, however, I personally like to top the mould with just a bit extra batter to cover the blueberries and create a smoother surface.

vegan blueberry donuts

Anyway, I had so much fun making these blueberry donuts and the associated video. The video production was a bit more technical than I expected: you have to think ten steps ahead, and make sure everything is just perfect, because you don’t want to start all over again. The editing process was quite lengthy (about three hours), but I really enjoyed it, and I can’t wait to explore the stop-motion video making realm. If you like the video, don’t forget to subscribe to my new YouTube channel. I’d really appreaciate it.

vegan blueberry donuts

Did you make this recipe?

Please let me know how it turned out for you! Leave a comment below or share a picture on Instagram and tag me so I can see your creation.

Keren x