Vegan Haloumi Cheese

How to Make Vegan Haloumi with Mad Millie Cheese Kit + Giveaway

Gosh, I’m excited about this post! It’s been four years since I last had haloumi cheese. And although I’ve experimented with making dairy-free cheeses for a while, I’ve never made haloumi cheese, at least until now. And it’s the best thing ever. And thanks to Mad Millie’s Vegan Cheese Kit, you too can learn how to make vegan haloumi at home.

Talk to any vegan or aspiring vegan, and they will tell you one of the hardest transitions to make is quitting dairy. It’s getting a little bit easier now to source good vegan cheeses, but they’re still like finding purple MnMs, still quite hard to find, and can be pretty pricey. The best (and the most affordable) way to get your cheese fix, therefore, is to make your own.

But making your own nut cheese is not without its challenges. I own three vegan cheese cookbooks and I can probably count the number of recipes I’ve tried from these cookbooks using just one hand (in other words, not a lot). Some of the ingredients can be hard to source, some of the recipes can be quite complicated and intimidating for first-timers, and sometimes it can be a long wait before you can eat your cheese, ranging between three days to 3 weeks.

What I love about Mad Millie’s Vegan Cheese Kit is that it provides you with all the ingredients you need to make your own vegan cheese. The recipe is also very simple and easy to follow. No specialised equipment or experience is required. Just add your choice of nuts and kitchen spices. The best thing is that all the cheeses can be made in less than a day!

The kit contains a thermometer, cheesecloth, citric acid, agar, tapioca flour, yeast flakes, cheese salt, instructions and recipe booklet. The kit makes approximately 3.6 kg of cheese before you need to replenish some of the ingredients. That’s a pretty decent amount of cheese I think, enough to feed a family with two hungry teens… or ten.

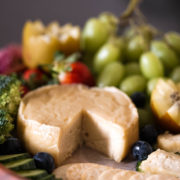
I have to say that the vegan haloumi I made using the kit was unexpectedly divine! Even Nat (my pescetarian/vegan hubby) says it tastes as close as 80% to the real thing… and I think that is excellent as far as dairy-free cheese goes. And Nat is a severe critic as he loves his haloumi!

I love adding this haloumi to salad or simply serving it with some fresh tomatoes and a drizzle of olive oil. Nom!

How to make a vegan haloumi

Seriously, you won’t believe how easy it is. You don’t even need to do any culturing! Click on the video below to see how to make vegan haloumi using the cheese kit.

You can see all the ingredients required to make the cheese, all provided in the kit (except the nuts and some pantry items of course). It’s a simple blend, cook, and chill process so you can spend more time eating them :D

[embedyt] https://www.youtube.com/watch?v=skXX6xDr-0Y[/embedyt]

Vegan Cheese kit Giveaway

Because the Mad Millie team are so awesome, they’ve agreed to give away one Vegan Cheese Kit to a lucky reader of Passionately Keren. To enter the giveaway, simply do any one of the following action to gain entry points.

Winners will be drawn on the 8th of December 2017. I think it would make a lovely Christmas gift, don’t you agree?

Mad Millie Vegan Cheese Kit

Do you like Haloumi cheese? If not, what’s your favourite cheese?


Vegan Triple Cream Brie

Vegan Triple Cream Brie

Gosh, I love cheese. How can you not? I especially like the soft and creamy kind… like Brie, my favourite cheese ever. And so it makes sense to veganise it, doesn’t it? I honestly believe this Vegan Triple Cream Brie is the closest thing to Brie I’ve made in a long time.

Vegan Triple Cream Brie

For a couple of years now I’ve been experimenting with nut cheeses. Sometimes they work, sometimes they don’t. When they work, I get so excited that the whole thing is gone before I have the chance to photograph it (hence the lack of vegan cheese blogposts). But when they’ve failed, however, it knocks me down for months…. such as that time I tried to make hazelnut cheese. It was a massive fail. The problem with nut cheese is that the ingredients are expensive. Hazelnut is close to $30 a kilo and raw cashew is about $35 a kilo.

Vegan Triple Cream Brie

But lately I’ve been having more luck in the cheese department. And this vegan double cream Brie was a success in one go. I’ve since made it a few times and have been able to consistently reproduce it.

Vegan Triple Cream Brie

This recipe was inspired by Julie Piatt’s ‘[amazon_textlink asin=’0735213798′ text=’This Cheese is Nuts’ template=’ProductLink’ store=’passionatelyk-20′ marketplace=’US’ link_id=”]’ cookbook. I’ve modified the ingredients to simplify the process a little. I definitely recommend you check out the book if you want to explore the world of nut cheeses. Unlike the other non-dairy cheese books I own, it has the least amount of ingredients, so you won’t have too much trouble sourcing most of them.

Vegan Triple Cream Brie

Vegan Triple Cream Brie

Creamy and delicious vegan brie

  • 2 cups raw cashews
  • 1 probiotic acidophilus capsule
  • 400 ml 13.5 ounce can coconut of milk
  • ¼ cup unrefined coconut oil (plus extra for greasing the mould)
  • 1 tsp fresh lemon juice
  • ¾ tsp sea salt
  • You will also need 2 mini spring-form round pans (11cm diameter)

The night before:

  1. Place cashews in 3 cups of filtered water. Cover and refrigerate overnight.
  2. Place the can of coconut cream in the refrigerator overnight.

On the day:

  1. Oil the pans with coconut oil (you can also use coconut oil spray).
  2. Rinse and drain the cashews. Transfer to your power blender (I use my beloved Vitamix). Add coconut oil, lemon juice, sea salt and the contents of the probiotic.
  3. Open the can of coconut cream and scoop out the solid cream at the top of the coconut milk. Take ¼ cup of the remaining coconut milk in the can. Transfer the coconut cream and coconut milk into the Vitamix.
  4. Blend on medium speed, using the plunger to distribute the mixture evenly until smooth.
  5. Transfer the mixture into the spring-form round pans. Cover with baking paper cut to fit the pans.
  6. Dehydrate for 24 hours at 35C. You can do this in the oven if your oven can be set to lower temperature, otherwise leave in the oven with the headlight on for 24 hours.
  7. Carefully remove the cheese from the mold using a sharp knife to release the edges. Place in an airtight container in the refrigerator for a day before serving. You can also age the cheese by placing them in a wine fridge for 1 to 3 weeks. Rub fine sea salt over your cheese every few days or so to prevent mold growth.

I recommend eating the brie on crackers or sliced cucumbers. It’s so good that sometimes I just eat it on its own.

P.S. If you make this, I’d love to hear from you. Leave a comment below or find me on Instagram and share your creation. Don’t forget to tag me @passionatelykeren so I won’t miss your post.

Keren x


If you like this post, sign up for my newsletter to get FREE recipes updates, lifestyle tips, and giveaways for sent to your inbox!
I hate spam. Your email address will not be sold or shared with anyone else.

[mc4wp_form id=”11238″]


[amazon_link asins=’0735213798,1607746778,1583335870,0865718369,1570672830′ template=’ProductCarousel’ store=’passionatelyk-20′ marketplace=’US’ link_id=”]

Goodness Me Box September Edition

Brown Rice, Kale and Bean Salad

Brown Rice, Kale and Bean Salad

Brown Rice, Kale and Bean Salad

If I have to pick my favourite grain, it’ll be rice every time. It’s delicious, nutritious and most importantly, it’s filling. This is especially important when making a plantbased salad, especially when you want something substantial that can keep you going for a few hours. This Brown Rice, Kale and Bean Salad is one of my favourites salads to make because, not only is it easy to make, it’s also a great make-ahead dish for dinner party, lunch boxes or picnic. Unlike most salads, this salad stays fresh for about three days in the fridge. In fact, it tastes better the day after you make it.

The sturdiness and toughness of kale leaves makes kale perfect for this salad. They hold their shape and keep their crunchiness and freshness in the salad mix even after three days in the fridge. You don’t even need to shred them finely, just chop the leaves and then ‘massage’ the leaves in olive oil for about 2 minutes. If you don’t know what that means, you’re essentially scrunching the leaves with your hands to break down the cell walls which, in turn, softens the leaves to make them more enjoyable and easier to eat. It also helps release the sugars within the leaves to make them less bitter. You know you’ve done enough when the kale feels softer and tastes somewhat sweeter than before.

This salad is also a great way to use up cooked brown rice. I cook rice regularly and so I always have leftover rice. This salad is a perfect way to transform a day or a two day old rice into a delicious lunch or dinner meal. I hope you give this salad a try!

Brown Rice, Kale and Bean Salad

A deliciously simple salad that’s full of protein and fibre. It is satisfying, easy to make and can be made a day ahead. Perfect for parties, potlucks, picnics and to fill up lunch boxes.

  • Kale bean salad
  • 2 stalks of kale
  • 1 cup of black beans
  • 1 red onion (finely chopped)
  • 1 avocado (diced)
  • 1 to mato (diced)
  • 1 cup brown rice
  • 2 tbsp olive oil
  • 1/2 tsp cumin
  • 1/2 tsp garlic powder
  • 1 tbsp lemon juice
  • 1/4 tsp cayenne pepper
  • 1/2 tsp pepper
  1. Wash and rinse kale, tear the leaves off the centre leaves and the stem and then tear or chop to bite size pieces. Place into a bowl, add oil and a pinch of salt. Massage for about 2 minutes until kale softens and turns to a bright colour.
  2. Combine the massaged kale, red onion, brown rice, and beans. Set aside.
  3. In a small bowl, whisk together the olive oil, lemon juice, salt, pepper, cumin and garlic powder until thick, about 45 seconds.
  4. Drizzle the dressing over the salad. Gently toss, taste, adjust seasoning if needed and then top with diced avocado (I usually add the avocado last so it doesn’t get mushed when I mix the salad dressing). Let it sit to marinate for at least an hour if you can or leave overnight in the fridge for the flavours to develop.

I always have cooked rice in the fridge I didn’t have to cook the rice. However, you can also buy instant brown rice at the shop that takes minutes to cook in the microwave.

What’s your favourite way to use up leftover rice? 

P.S. If you make this, I’d love to hear from you. Leave a comment below or find me on Instagram and share your creation. Don’t forget to tag me @passionatelykeren so I won’t miss your post.

Keren x


If you like this post, sign up for my newsletter to get FREE recipes updates, lifestyle tips, and giveaways for sent to your inbox! I hate spam. Your email address will not be sold or shared with anyone else.

[mc4wp_form id=”11238″]

Cardamom pistachio cookies with rose petals

Vegan Cardamom and Pistachio Shortbread Cookies (with Rose Petals)

I don’t normally bake cookies, but when I do, I go all out, calories and everything. No skimping on the fat or sugar (okay, maybe a bit less sugar than your traditional cookies, but only because I don’t like my cookies way too sweet). I especially love making shortbread cookies because they remind me of my childhood. My parents used to buy us a huge tin of butter cookies for Christmas, and I fondly remember those crispy, tender, melt-in-your-mouth buttery biscuits of goodness. Lately, I’ve been obsessed with putting spices in baked goods, so when I saw a packet of ground cardamom at the shops, I knew exactly what I had to do. And that’s how these Vegan Cardamom and Pistachio Cookies were born.

Cardamom pistachio cookies with rose petals

Cardamom pistachio cookies with rose petals

For these cookies I used ground coconut sugar, but you can use normal powdered sugar if you prefer. I pulsed coconut sugar in a power blender for a minute or so until it turned into powder form. I also did the same thing with the rose petals (just not for as long) – I removed the petals from the stem, and then pulsed a couple of times using my NutriNinja until crumbs form.

Cardamom pistachio cookies with rose petals

These cookies have that enchantingly sweet and aromatic smell of cardamom. They’re nutty and spicy, with a hint of aniseed and perfumed rose flavour. They will keep for about two weeks in an airtight container at room temperature, but I must say they didn’t last that long in our household before they were all gone.

Vegan Cardamom and Pistachio Shortbread Cookies (with Rose Petals_

Deliciously nutty, spicy, and aromatic buttery cookies that just happened to be vegan :)

  • 1 cup vegan butter or Nuttelex (220g, room temp)
  • 1/3 cup powdered coconut sugar (see note)
  • ½ cup pistachio nuts
  • 2 1/3 cup plain flour
  • 2 teaspoons rose water
  • 1 teaspoon almond extract
  • 1 teaspoon cardamom powder
  • 1/2 teaspoon of salt
  • 2 tablespoon dried rose petals (plus extras for sprinkling (see above))
  1. Preheat oven to 180 degrees.
  2. Sift all dry ingredients together (flour, sugar, and salt).
  3. In a medium bowl, using a wooden spoon, mix butter and almond extract together.
  4. Pulse pistachio nuts in a blender a few times until fine crumbs form.
  5. Add the dry ingredients and the pistachio nuts into the butter mixture and mix everything together. Use your hands if necessary to incorporate the butter and get the dough to come together. Stop when it has just come together. Careful not to over mix.
  6. Shape 1 tablespoon of the mixture into even sized balls and press into flat discs. Place onto a baking sheet lined with baking paper.
  7. Bake for 12-15 minutes until set and the edges are golden brown.
  8. Leave to cool completely.
  9. Enjoy!

To make powdered coconut sugar, pulse coconut sugar in a power blender for a minute or so until powdery.

If you’re a cardamom fan, I hope you will try this recipe. And if you do, I’d love to hear from you. Leave a comment below or find me on Instagram and share your creation. Don’t forget to tag me @passionatelykeren so I won’t miss your post.

Keren x