Cardamom pistachio cookies with rose petals

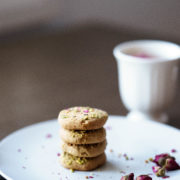
Vegan Cardamom and Pistachio Shortbread Cookies (with Rose Petals)

I don’t normally bake cookies, but when I do, I go all out, calories and everything. No skimping on the fat or sugar (okay, maybe a bit less sugar than your traditional cookies, but only because I don’t like my cookies way too sweet). I especially love making shortbread cookies because they remind me of my childhood. My parents used to buy us a huge tin of butter cookies for Christmas, and I fondly remember those crispy, tender, melt-in-your-mouth buttery biscuits of goodness. Lately, I’ve been obsessed with putting spices in baked goods, so when I saw a packet of ground cardamom at the shops, I knew exactly what I had to do. And that’s how these Vegan Cardamom and Pistachio Cookies were born.

Cardamom pistachio cookies with rose petals

Cardamom pistachio cookies with rose petals

For these cookies I used ground coconut sugar, but you can use normal powdered sugar if you prefer. I pulsed coconut sugar in a power blender for a minute or so until it turned into powder form. I also did the same thing with the rose petals (just not for as long) – I removed the petals from the stem, and then pulsed a couple of times using my NutriNinja until crumbs form.

Cardamom pistachio cookies with rose petals

These cookies have that enchantingly sweet and aromatic smell of cardamom. They’re nutty and spicy, with a hint of aniseed and perfumed rose flavour. They will keep for about two weeks in an airtight container at room temperature, but I must say they didn’t last that long in our household before they were all gone.

Vegan Cardamom and Pistachio Shortbread Cookies (with Rose Petals_

Deliciously nutty, spicy, and aromatic buttery cookies that just happened to be vegan :)

  • 1 cup vegan butter or Nuttelex (220g, room temp)
  • 1/3 cup powdered coconut sugar (see note)
  • ½ cup pistachio nuts
  • 2 1/3 cup plain flour
  • 2 teaspoons rose water
  • 1 teaspoon almond extract
  • 1 teaspoon cardamom powder
  • 1/2 teaspoon of salt
  • 2 tablespoon dried rose petals (plus extras for sprinkling (see above))
  1. Preheat oven to 180 degrees.
  2. Sift all dry ingredients together (flour, sugar, and salt).
  3. In a medium bowl, using a wooden spoon, mix butter and almond extract together.
  4. Pulse pistachio nuts in a blender a few times until fine crumbs form.
  5. Add the dry ingredients and the pistachio nuts into the butter mixture and mix everything together. Use your hands if necessary to incorporate the butter and get the dough to come together. Stop when it has just come together. Careful not to over mix.
  6. Shape 1 tablespoon of the mixture into even sized balls and press into flat discs. Place onto a baking sheet lined with baking paper.
  7. Bake for 12-15 minutes until set and the edges are golden brown.
  8. Leave to cool completely.
  9. Enjoy!

To make powdered coconut sugar, pulse coconut sugar in a power blender for a minute or so until powdery.

If you’re a cardamom fan, I hope you will try this recipe. And if you do, I’d love to hear from you. Leave a comment below or find me on Instagram and share your creation. Don’t forget to tag me @passionatelykeren so I won’t miss your post.

Keren x

Cold Pressed Beetroot Juice

Halloween post – my new routine and the cold-pressed blood juice

I have a new routine. For about three weeks now, I’ve been doing half-day juice fasts for two or three days each week, and it’s been great. I will talk about this more in the next blogpost, but today, I thought I’d give you a quick rundown of my routine, what I use to juice, and share a Halloween-themed juice recipe – Cold Pressed Blood Juice, seeing that the big trick-or-treating day is just around the corner.

Cold Pressed Blood Juice

My half-day juice fast routine

Essentially I’m drinking just juice from the morning until the afternoon. When possible I’m trying to have my first juice as late as possible so I can maximise my ‘fasting’ period. I normally undertake this routine on Monday, Tuesday and sometimes Wednesday as well.

I find it easier to do the juice fast during the first half of the week as I have more time to prepare on the Sunday prior, and I like to make my juices in advance so I needn’t waste time in the morning juicing. Cold-press juicing does take quite a bit of time, and since I personally hate cleaning up, I always like to do everything in bulk so I won’t have to clean the juicer every day.

Green Juice

Here’s a breakdown of my juice fast day

  • 8 pm (the night before): Finish dinner
  • 9 am: Breakfast – 450ml green juice (kale, spinach, celery, parsley, green apple and lemon)
  • 11am/12 pm: Lunch – 450ml carrot and beetroot juice (carrot, beetroot and ginger)
  • 3pm: Afternoon Snack – 450ml orange and carrot juice (or other fruit juice)
  • 5pm: Light snack (can either be fruits, nuts, rice cakes or other light snacks)
  • 6:30-7pm: Normal dinner

My Cold Press juicer

I use the Hurom H25 Alpha. It’s a bit pricey but it’s a great little machine. It’s much smaller than my old Breville Fountain juicer that I used way back in the day.

I must say that assembling the machine for the first time was quite daunting. I’ve never used a cold-pressed juicer and there were so many more parts than what I’ve used to. I had to actually read the user guide (as you should!) to make sure that I was assembling it correctly.

It has a pretty small chute, which means that you have to chop your larger fruits and veggies so they fit through. I had known about this requirement from reading reviews of the juicer and I honestly don’t mind the process. I mean, as a vegan, I already spend 80% of my time in the kitchen chopping fruits and vegetables so a bit more chopping won’t hurt. And, furthermore, I find chopping to be rather… therapeutic.

Cleaning the machine has been a breeze, especially now that I’ve gotten used to it. It took me 10 minutes to clean at the beginning but now, I’m down to about five minutes flat.

Overall I’m very happy with my Hurom H25. It does its job, it’s quiet and compact, and it looks pretty slick on the kitchen bench.

Hurom H25 Alpha

Here’s the video to see me (and the juicer) in action, making my favourite carrot juice and the Cold Pressed Blood Juice.

[embedyt] https://www.youtube.com/watch?v=QrU6wxNvtpY[/embedyt]

Cold-Pressed Blood Juice

This recipe is so simple that I almost didn’t want to share it. But it really is one of my favourite juices to make. And it does look impressive, especially when served in a skull jar!

Cold-Pressed Blood Juice

This recipe is so simple that I almost didn’t want to share it. But it really is one of my favourite juices to make. And it does look impressive, especially when served in a skull jar! Cold-Pressed Blood Juice (makes 500ml)

  • 8 large carrots
  • 1 large beetroot
  • 1 knob of ginger
  • Coconut water (optional)
  • <a href="https://www.amazon.com/Glass-Decanter-Container-Whiskey-Tequila/dp/B07427T8QW/ref=sr_1_7?s=home-garden&ie=UTF8&qid=1509265589&sr=1-7&keywords=skull+jar"><a href="http://amzn.to/2yZDvV8">Skull jar</a></a> (optional)
  1. Wash and rinse your vegetables. Chop them if required.
  2. Add the carrots, beetroot and ginger into your cold press juicer and run as per manufacturer’s instruction.
  3. Transfer to a jar and top with coconut water if required.
  4. Serve immediately or store in the fridge for up to three days.

What’s your favourite cold-pressed juice? I’d love to hear from you!

Keren x

Easy Strawberry Jam

Easy Strawberry Jam

I love strawberries! Especially when they’re in season. Sometimes I like adding strawberries to my smoothies and oats, but mostly I like eating them fresh out of the punnet. However, the other week, I made some vegan waffles and I felt like slathering them with some peanut butter and strawberry jam. But the problem is, I don’t have any jam. I’ve stopped buying jams two to three years ago as I find them too sweet for me. Did you know that traditional jam uses 1 cup of sugar per 250g strawberries? That’s insane! So I’ve decided to make my own quick and easy strawberry jam.

YUM! This easy strawberry jam is not only simple to make (you only need four ingredients), but it also tastes soooo fresh. I use raw sugar in this recipe, but you can replace it with your favourite natural sweetener such as Stevia, Norbu or even Xylitol. Nowadays, I don’t mind a bit of sugar here and there, and plus, it’s nowhere near the amount of sugar in storebought jams. Only three (3) tablespoons instead of one cup of sugar used in the traditional jam recipe!

Easy Strawberry Jam

If you ever wanted to make a small volume of jam, without all the fuss of finding jam sugar, pectin, or having to sterilise jars, then this recipe is for you.

Easy Strawberry Jam

Make your own homemade low sugar strawberries using only a handful of ingredients.

  • 1 punnet (250g fresh strawberries)
  • 3 tablespoons of raw sugar*
  • 1 tablespoon lemon juice
  • Zest of half lemon
  1. Wash, drain and hull strawberries.
  2. Add to a small pan on medium heat and start mashing the strawberries (use potato masher or fork).
  3. Add sugar and lemon juice into the pan.
  4. Bring to boil and then lower the heat and simmer until most of the liquid has evaporated and the mixture thickens, about 15 minutes.
  5. Transfer into a clean, airtight jar (I got mine from IKEA), let it cool, and store in the fridge for about 2 weeks.

*You can replace sugar with your favourite sweetener such as Stevia, Norbu or Xylitol

If you make this, I’d love to hear from you. Leave a comment below or find me on Instagram and share your creation. Don’t forget to tag me @passionatelykeren so I won’t miss your post.

Keren x


Vegan Lemon Curd

Vegan Lemon Curd and yum. Glutenfree book giveaway

Well hello!

Sorry for being a bit quiet this week. I’ve just started a new part-time consulting role and so things have been a bit hectic the last few days. But now I’m here and I’ve got a little surprise for you.

I’m giving away two (2) yum. Glutenfree 2017 Mini Cookbook, thanks to Olivia from yum. Glutenfree.

It has 30 home-cooked 100% gluten-free recipes from a variety of food bloggers, health coaches, nutritionists, and foodies. It is also in a super cute A5 size.

It is not a vegan cookbook but there are many vegan and easily veganised recipes. They also have “allergen buttons” at the bottom of each recipe, so you can see all the allergens that each recipe is free from. This makes it super easy to select a recipe for people with allergies.

The recipe book is about one-third sweet, savoury and snacks, so there’s something for everyone.

I haven’t had a chance to make any of the recipes from the cookbook yet, but Olivia was kind enough to let me share one of my favourite recipe from the cookbook, the Vegan Lemon Curd by Monica Topliss from Gluten Free Food Co – this is probably one of my favourite recipes from the cookbook.

Hope you will give it a go!

Vegan Lemon Curd

  • 100 ml lemon juice
  • 1 tablespoon lemon zest
  • 400 g coconut milk
  • 50 g raw sugar
  • 80 g coconut butter
  • 15 g maize starch
  1. Place coconut milk, sugar, coconut butter and zest into a small pot and bring to the boil. Mix the lemon juice with the maize starch and mix well.
  2. When the mixture in the pot has reached the boil, turn down the heat and whish in the lemon juice mix paste. The mixture should thicken almost instantly
  3. Continue to cook over a gentle heat, whisking continuously for one minute
  4. Remove from the heat and spoon into a sterilised jar

How to enter the giveaway

To enter the giveaway, simply do any one of the following to gain entry points. Winners will be drawn in on the 4th November 2017.

yum. Glutenfree Mini Cookbook Giveaway

Turmeric Stir Fried Brown Rice

Healthy Turmeric Stir Fried Brown Rice

Today I will share with you one of my favourite things to make (next to these tasty things). *Drumroll*….. please be upstanding for the Healthy Turmeric Stir Fried Brown Rice!

Healthy Turmeric Stir Fried Brown Rice

Everyone has a favourite recipe. It’s that dish that you love, that everybody else loves, that always works, no matter how crazy you get with the ingredients or how lazy you may get with the steps. It’s the recipe that you can almost make blindfolded.

For me, that go-to recipe is fried rice!

Boy, do I love making fried rice. It’s such a simple and delicious dish with endless possibilities! I love loading mine with veggies and tofu and, lately, turmeric. The turmeric adds such a nice spicy and earthy flavour to the rice. At home, back in Indonesia, my mum used to make me a similar dish so it always reminds me of her whenever I prepare this dish. And I make this almost every week.

Healthy Turmeric Stir Fried Brown Rice

Here’s the recipe video followed by the full recipe. Some professional chefs and seasoned cooks might express scorn for adding my aromatics (onions and garlic) after the tofu and not before, and how I haven’t set aside the tofu pieces after browning them. Sorry. I’m occasionally lazy, and in my opinion, there isn’t a significant difference in taste. Furthermore, it saves me an extra few minutes and a dish which, at 6 pm after a long day at work, makes all the difference in the world.

[embedyt] https://www.youtube.com/watch?v=F1NWaWpxGX0[/embedyt]

You can get really creative with this dish. I use brown rice with broccoli and carrots but you can use different veggie combinations or a different type of rice. One time I even used cooked barley and it worked well, too. You can also use tempeh instead of tofu, seitan, mushroom, chickpeas, or all the above. Trust me, I’ve tried almost every possibility under the sun.

Healthy Turmeric Stir Fried Brown Rice

Healthy Turmeric Stir Fried Brown Rice

  • 1 head of Broccoli (cut into florets)
  • 1 Red Onion (diced)
  • 5 garlic Cloves (sliced)
  • 200 g Firm Bean Curd (sliced)
  • 2 cups of cooked Brown Rice
  • 2 Carrots (sliced thinly)
  • 3 tablespoons of Coconut Oil
  • 1-2 teaspoon of Light soy sauce
  • 1/2 teaspoon Turmeric Powder
  • A sprinkle of Ground Pepper
  • 1 cup chopped fresh Coriander
  • 1-2 cups of chopped mushroom (optional)
  • A sprinkle Kala Namak  (optional)
  1. Heat oil in wok (preferably non-stick) over high heat, add sliced tofu, swirling to coat surfaces; add sliced bean curd.
  2. Add 1 teaspoon of salt to bean curd and then add 1/2 teaspoon turmeric powder. Stir-fry for 2 minutes until brown.
  3. Add chopped red onion, stir, add garlic and then stir-fry until onions are soft and slightly brown, about 3 minutes.
  4. Add brown rice, broccoli and carrots, stir. Then add soysauce and stir for about 3 minutes to mix.
  5. Add chopped mushroom (optional) and, stir-fry for another 2 minutes more, taste.
  6. Adjust the flavour by adding more sauce or season to taste.
  7. Fold in chopped coriander to finish.
  8. Serve

Serve with slices of fresh chilli for spicy boost.

If you make this, I’d love to hear from you. Leave a comment below or find me on Instagram and share your creation. Don’t forget to tag me @passionatelykeren so I won’t miss your post.

Keren x


Healthy Turmeric Stir Fried Brown Rice


15 Things You Can Do to Boost Your Mental Health

“They called me mad, and I called them mad, and damn them, they outvoted me.”
― Nathaniel Lee

To celebrate Mental Health awareness week in Australia, and the National Mental Health day on Tuesday 10th October, I thought I’d share with you some fun ways you can boost your mental health. But first, let’s clear up some confusion, shall we? What is Mental Health?

What Mental Health is NOT

The term mental health is often misunderstood. I too have been guilty of misrepresenting it. For a long time, when people talk about mental health, I think about a particular mental health condition, such as paranoia schizophrenia as depicted in the movie A Beautiful Mind, which by the way, is a very good movie; or clinical depression, which is another common (if misunderstood) condition.

But mental health is not about mental condition or illnesses or the absence of these conditions.

What is Mental Health?

According to the World Health Organization, mental health is “a state of well-being in which every individual realises his or her own potential, can cope with the normal stresses of life, can work productively and fruitfully, and is able to make a contribution to her or his community.”

So it is the combination of our emotional and psychological well-being. It affects how we feel, how we think and how we function in the society.

It is more about wellness rather than being about illness.

I like this explanation from Beyond Blue:

“…it’s important to remember that mental health is complex. The fact that someone is not experiencing a mental health condition doesn’t necessarily mean their mental health is flourishing. Likewise, it’s possible to be diagnosed with a mental health condition while feeling well in many aspects of life. Ultimately, mental health is about being cognitively, emotionally and socially healthy – the way we think, feel and develop relationships – and not merely the absence of a mental health condition.”

Why we need to look after our mental health

When we look the true definition of mental health, it is clear that keeping in good mental health is vital in order to function at your utmost in life.

It can be very easy to dismiss the idea of maintaining a good mental state if you haven’t had to go through difficult times. If you have had some hard knocks or you’ve experienced traumatic events, then you’ll know how important this can be.

Think of mental health like your physical health, but for the mind. And just like your physical health, if you want to improve your mental fitness, you have to do the work!

And that brings us here, to a list of things you can do to boost your mental health. If you can make time to go to the gym, then you sure can make time for some of these activities, especially since they’re all fun!

15 Things You Can Do to Boost Your Mental Health

  1. Watch a feel-good movie
  2. Take that class that you’ve always wanted to take, just for fun (such as an art drawing class)
  3. Paint, draw, write or do something creative
  4. Eat something you absolutely love
  5. Spend some time outside in nature or visit a museum or a gallery
  6. Pat a pet, or your friend’s pet, or a stranger’s dog at the park
  7. Do something fun or silly that makes you happy
  8. Spend time with close friends and other people who lift you up
  9. Enjoy a long bath or shower
  10. Wear something that makes you feel and look great (the two go hand in hand, by the way- if you look good, you’ll feel good as well)
  11. Do a mini spring clean and find things to donate to the less fortunate
  12. Learn yoga and mindfulness practice
  13. Read your favourite book
  14. Exercise (think of fun exercises like rock climbing, dancing, martial arts, pole dancing?)
  15. Play – whatever that might look like to you

If the list above sounds unexpectedly simple, that’s because it is. Self-care, social interaction, and play are all simple but oh-so-vital to maintaining your good mental health.

Please note that if you are non-neurotypical, or suffering from a debilitating mental illness, or simply feel overwhelmed by the above list and the potential of not being able to achieve many of the activities. Don’t stress. These are just suggestions. Just try to pick one of the activity if you have the energy and don’t feel defeated if you can’t. You might even have other things you love to do that is not on this list.

On that note, what are your favourite things to do for mental health? Do share them in the comment section below.

Keren x

If you need any mental health advice or support in Australia, visit Beyond Blue – they have a great library of resources on their website and a good support network.

Disclaimer: The content provided in this post is not intended and should not be construed as medical advice. Always seek the advice of a physician or other qualified health provider with any questions you may have regarding a medical condition.

Sydney Night Noodle Market – What’s Vegan?

The Good Food Month is here and the Night Noodle Market is on again! From 5 – 22 October 2017 Hyde Park is going to be full of hungry crowds and delicious food. “If only they have more vegan dishes”, says every vegan foodie!

I have to say that although it’s not very vegan-friendly, you can certainly find something there. I used to love going to these types of events back in my pre-vegan days and I see no reason to stop. My motto is “you always find something!”

Anyway, if you’re planning to go to the noodle market with your friends and wonder what plant-based options are , I’ve reviewed all the vendors’ menu so you don’t have to waste time checking the menu of the stallholders that don’t serve vegan foods.

I’ve tried to be as thorough as I can but as this is simply a review of all the menus, please check with the vendors to confirm that they are indeed vegan.

For all item marked with asterisks (*) – make sure to specify no egg, ghee or fish sauce or check for their absence just to be sure.

BANGKOK STREET FOOD

Pad See Eew *


BITE CHEW DRINK

None


BLACK STAR PASTRY

None


CHAT THAI

Mango Sticky Rice – Fresh-cut mango with salty coconut cream, mung beans and sweet sticky rice

Pad Thai Vegetarian*


CHEFS GALLERY

None (pretty disappointed with this, they actually do have vegan dishes in their restaurant)


CHINESE DIM SUM KING

Vegetarian and mushrooms dumplings*

Vegetable Spring rolls

Red Bean Buns*


CHUR BURGER

None


CHUR-KEN

None


CLOUD THIEF (Formerly Bao Stop)

None


DIN TAI FUNG

Vegetarian Dumpling*

Vegetarian Spring Roll*

Sweet Buns*


DONBURI STATION

Vegetarian Gyoza*

Edamame


GELATO MESSINA

None


HANOI STREET VENDOR

Vegetarian Spring Rolls*
Lemongrass tofu – with mushroom vermicelli noodle


HARAJUKU GYOZA

Long fries Deep fried long fries with salt
Raindrop Cake* (I actually had this in their restaurant and it was confirmed vegan. However, I believe this comes with green tea ice-cream so check if they can omit it)


HOUSE OF CRABS

None


HOY PINOY

None (unless you fancy eating just rice)


INDU

Garam Masala Eggplant Dosa Garam masala eggplant dosa, bitter melon, beetroot coconut cream*


LET’S DO YUM CHA

The vegetable dumplings are vegan


LITTLE KYOTO

Yakisoba Japanese fried noodles*


MAMAK

Roti Pisang Roti with freshly sliced banana*
Roti Canai Original roti with vegetarian curry*


MAYS MALAYSIAN HAWKER

Char Kway Teow Flat rice noodles stir-fried over high wok fire with Chinese chives, bean sprouts and special soy*


MONTANITA

None


MR BAO

None


NUTIE DONUTS

All the ice creams sammies and bentos vegan. For the donuts, the vegan options are:
– snickers
– couch potato
– blueberry pie
– pandan taro
– deluxe mango coconut nest

P.S. Everything is gluten-free too


ONE TEA LOUNGE

Matcha Baoger sliders without Green Tea Mayo

Ramen Sliders do contain egg content along with the green tea mayo has dairy content however the ramen tofu sliders are fine for vegetarians.

They also have served vegetarian customers our Waffle Fries without the duck but includes the housemade Spicy Hoisin sauce


POKE BEAR

Sweet Potato Poke Bowl is Vegan as standard


POKLOL

None


PUFFLE

None


SATAY BROTHERS

None


SHALLOT THAI

Thai Vegetable Spring Rolls*


SPANTHAI

Fresh mango & sticky rice with coconut sauce

Pad see-iew (ask for vegetarian option)*

Vegetable spring rolls & samosas*


TAIWAN NOODLE HOUSE

None


TEPPANYAKI NOODLES

Yakisoba Veggie*


THAI RIFFIC

Vegetable Spring Rolls*


THE BURMAN KITCHEN

None


THE RICE PANTRY.
Crispy Netted Vermicelli with Vegetarian option*


THE WAGYU

None


TWISTTO

Korean twist potato deep fried (the only product they sell and it’s vegan)


WAFFELAND

None


WATERMAN’S LOBSTER CO.

None


That’s it. Hope this list can help you navigate the night noodle market.

Again, for all the above item marked with asterisks (*) – make sure to specify no egg, ghee or fish sauce or check for their absence just to be sure.

It is my dream that the Good Food Month event will become more and more vegan-friendly in the future, but the only way for that to happen, I believe, is to attend the various events around this month and show that the demand is there. If all the vegans in Sydney go and say, “I wish you have more vegan options” I’m sure that would make a difference, perhaps?

Enjoy the good food month peeps!

Keren x

Perfect Roast Potatoes

How to make perfect roast potatoes

Today I will share with you some of my tips on how to make perfect roast potatoes. You know, the kind that have a deliciously crispy crust and are fabulously fluffy inside.

Let’s get to it.

Tip #1. Start with the right type of potatoes

To make perfect roast potatoes you need to use the right type of potatoes. There are two main types of potatoes:

Floury potatoes

These potatoes have a higher starch content and low moisture content which makes them perfect for roasting and chipping.

and…

Waxy potatoes

These potatoes are higher in moisture and lower in starch content. They’re good at keeping their shape when boiled and therefore are excellent for salads and soup.

You need the floury kinds.

Tips: You can also use the popular all-rounder which often have a medium starch content that sits somewhere in between the waxy and starchy potatoes, such as Desiree or Royal Blue potatoes.

Did you know that most of the potatoes in Australia are grown in South Australia?

Here’s a good website that lists the different varieties of potatoes. Contrary to what you see at the shops, there is much more variety of potatoes beyond ‘washed’ and ‘brushed’ potatoes.

For roasting, my favourite are Coliban, King Edward and Kestrel Potatoes.

Tip #2. Get them rough around the edges 

In order to get that lovely crispy skin which makes roast potatoes so delicious, you can do two things:

  1. Pre-boil the potatoes and cook them until the edges start to get rough, or
  2. Cook them in the oven and shake the pan to rough the surface once the potatoes are cooked.

The oil will gather in the cracks and crevices creating a crispy outer skin. Method number one produce crispier potatoes but it does involve another step (and an extra dirty dish). Number two is a tad simpler, but it takes a bit more time as the potatoes take longer to cook in the oven.

Tip #3. Do not skimp on the oil

If you do, you won’t get that lovely crispy skin you’re lusting after. For 1 kg of potatoes, I won’t use less than two tablespoons of oil. And for the oil, you can use oil you like. I normally use olive oil and coconut oil because I like the flavours.

Tip #4. Do not crowd your pan 

You want a single layer of potatoes on your pan, no more.

If your pan looks a bit overcrowded, use a second pan. You need enough space between each piece of potato to ensure perfect roasting and maximum crispiness.

Tip # 5. Be patient

To make the perfect roast potatoes you need to be patient. It takes time! Between 1.5 to 2 hours to be exact. Some things you just can’t rush!

Here’s my basic roast potato recipe, which makes deliciously crispy potatoes, every time.

I hope you will try them.


Perfect roast potatoes

Make deliciously crispy potatoes at home.

  • 1 kg Coliban potatoes (or any floury potatoes)
  • 2 tbsp olive oil
  • 1 tsp sea salt
  • Fresh herbs to flavour (optional)
  1. Cut potatoes into halves or quarters (depending on their size). I like keeping the skin on but feel free to peel them. Wash under running water to remove the starch and then drain.
  2. Preheat the oven to 180°C. Transfer potatoes into a large saucepan and then add enough water to cover them.
  3. Cook for about 20 minutes until the potatoes are soft but not mushy. Drain potatoes. Return to the pan and heat for a few minutes to evaporate any remaining water. Then shake the pan briskly to ‘rough up’ the surface of the potatoes.
  4. Pour olive oil into a roasting pan big enough to hold the potatoes in one layer. Add the potatoes to the pan and coat them in the oil.
  5. Place in the oven and cook for 45 minutes. Turn and then cook again for another 30 minutes, or until the potatoes are golden brown and crispy all over.
  6. You can also add one to two tablespoon of fresh herbs such as rosemary or oregano at the end of the baking period to give a nice boost of flavour to your roast potatoes.
  7. Serve immediately.


How to Make Perfect Popcorn On The Stove

Seriously, who doesn’t know how to make popcorn on the stove?

Well, as it turns out – a lot of people, including my poor sister. She often buys these bags of awful, artificially flavoured microwaveable popcorn.

Microwave popcorn is evil

There was a case in 2007 where a heavy consumer of microwaved popcorn was diagnosed with “popcorn lung” (an irreversible lung disease) after inhaling fumes from microwaved popcorn over time. He sued the popcorn company for failing to warn that “preparing microwave popcorn in a microwave oven as intended and smelling the buttery aroma could expose the consumer to an inhalation hazard and a risk of lung injury.”

He won the case in 2012 and was awarded millions of dollars in damages.

Scary huh!

The chemical that causes this lung injury is called diacetyl. It’s what gives microwaveable popcorn that intense buttery flavour. And while some popcorn brands have replaced diacetyl with another type of ‘flavouring’, the chemical is still considered safe by the United States’ FDA and, in Australia, no regulation has been established.

If you’re still buying microwaveable popcorn, maybe it’s time you try to make it yourself. It’s so easy and it costs just pennies to make.

After I showed my sister how to cook popcorn on the stove, she’s been making popcorn for my parents and herself almost every week; and the best thing is, she has now stopped buying microwaveable popcorn!

How to make perfect popcorn on the stove everytime

Fresh home-made popcorn is delicious and it is such an easy, quick, healthy and tasty snack that everyone can make.

If you can, get good quality organic popcorn (I got mine from The Source Bulkfoods. It really does make a difference. I find the organic popcorn more flavourful and ‘popped’ more evenly so you get very little un-popped kernel, if any. After been making popcorn for years I finally realised that a lot of my failures are the result of bad quality popping corns.

Here’s a recipe which you can follow. I generally don’t measure the ingredients. I just use enough oil to coat the base of the pan and then add just enough popcorn kernels to cover the base (depending on the size of the pan). The secret is to only have a single layer of kernels covering the pan’s base so they all get an equal amount of heat, otherwise you may risk having unpopped kernels mixed among the popcorn.

How to Make Perfect Popcorn On The Stove

Learn how to make perfect popcorn on the stove. This is favourite snack to make. It’s so quick to make, easy, and taste delicious!

  • 3 tbsp vegetable oil (I also like to use coconut oil)
  • 1/2 cup popping corn
  • 1/2 tbsp of finely ground salt (optional but recommended)
  • Other seasonings (my favourite is nutritional yeast for B12 boost)
  1. Add the oil in a heavy-based pan with a vented lid. Turn the heat up to medium-high (I use level 7 on my induction cooktop), add 3 corn kernels and cover.
  2. Once the kernels have popped add the remaining popcorn kernels and salt in an even layer. Cover.
  3. Remove from heat and count for 30 seconds. Don’t skip this part as it will bring all of the other kernels to the same temperature so they will pop at roughly the same time later, and you won’t have too many unpopped kernels, or burn your popcorn in an attempt to pop them all.
  4. Return the pan back to heat and wait for that popping sound (or if you have a clear lid, you can see the action happening).
  5. Once the kernels begin to pop rapidly, gently shake the pan by moving it back and forth.
  6. Open the lid a tiny bit to allow excess steam to escape.
  7. When the popping slows to a few seconds between pops, turn off the heat. Wait a few extra seconds for the last few pops, then remove the lid and pour into a large bowl.

Tips: Use oil suitable for high temperature cooking such as canola or peanut oil. If you want to use olive oil for flavour – mix the oil with peanut or canola 1:1 so that the oil won’t burn.

I’d love to hear from you if you make this popcorn recipe. Leave a comment below or find me on Instagram and share your creation. Don’t forget to tag me @passionatelykeren so I won’t miss your post.

Keren x

Vegan Adobo with Tempe and Brown Rice

Today I’m going to share with you one of my favourite comfort foods –Vegan Adobo with Tempe and Brown Rice. It’s delicious, comforting, easy to make and a perfect one-pot meal. This recipe was actually inspired by Maz Valcorza from Everyday Vegan. I was shooting and directing a video recipe for the one of their online recipe courses and one of the recipes was a vegan adobo.

Her version uses brown rice and Bok choi and it was so yum! I was inspired to make my own version of adobo and so here it is. This vegan adobo uses tempe and brown rice as the main ingredients, as well as mushrooms and broccoli for flavour, nutrition and texture!

It’s like an asian version of risotto!

Vegan Adobo with Tempe and Brown Rice

If you’ve never heard of adobo before, it is a Phillipino/ Spanish dish that usually involves cooking meat, seafood, or vegetables in a vinegar- soy sauce marinate.

It is usually made with meat but I have found that tempe (or tempeh) and mushroom make the perfect meat replacement without sacrificing that delicious savoury flavour and texture that we all love from meat.

The key ingredients in this dish are garlic, soy sauce, apple cider vinegar, bay leaves, and coconut sugar (you can use normal or brown sugar too). You can use tofu instead of tempe or even your favourite legumes. I use broccoli for this recipe but feel free to use other greens. I’ve made this dish so many times using different greens, beans, etc and they always turn out good. Just make sure you don’t overcook it as they can turn out gluggy (kinda like risotto).

Lately, I’ve been switching between dark mushroom soy sauce to light soy sauce depending on what I feel like. You can tell the difference in colours (left – dark soy sauce, right – light). For some reason the dark soy sauce product more ‘sticky’ glaze. Both are equally delicious though.

Check out the how to video below and then the recipe on the bottom of the page.

[embedyt] https://www.youtube.com/watch?v=dTrcpj3en0U[/embedyt]

Vegan Adobo with Tempe and Brown Rice

Vegan Adobo with Tempe and Brown Rice

A delicious twist on the ever-so-popular Philipino dish, Adobo. Made vegan using tempe as the main protein, brown rice, mushroom and broccoli florets. Yum!

  • 1 tablespoon coconut oil
  • 1 packet (250g of raw tempe, diced)
  • 5 garlic cloves (diced)
  • 1 red onion (diced)
  • 2 cups sliced mushrooms (oyster or brown mushrooms are my favourite to use)
  • 2 cups broccoli florets
  • 3 tbsp soy sauce (dark soy sauce will give you a darker colour than light soy sauce)
  • 1 tbsp apple cider vinegar
  • 3 tablespoons coconut sugar
  • 4 bay leaves
  • 2 teaspoon whole peppercorns
  • 4 cups vegetable stock
  • 1 ½ cups brown rice
  1. Heat the coconut oil in a large pot over medium-high heat. Cook pieces until golden brown on both sides, then remove. Stir in the red onion and garlic; cook until they soften and brown, about 6 minutes.

  2. Pour in soy sauce, bay leaf, peppercorn, vegetable stock, and vinegar. Add the tempe and rice, increase the heat to high, and bring to a boil. Reduce heat to medium-low, cover, and simmer until the rice is about 30-40 minutes.

  3. Stir in broccoli florets and mushrooms, cover for 5 minutes until broccoli and mushroom is cooked through

Vegan Adobo with Tempe and Brown Rice

I absoloutely love a one pot meal. Especially since I often don’t have time to cook an elaborate meal for dinner (strange coming from a food blogger I know). What’s your favourite one-pot meal? Share it with me in the comments below and I’ll try to make veganised one-pot deliciousness :) ✎ ♥

Did you make this recipe?

Please let me know how it turned out for you! Leave a comment below or share a picture on Instagram and tag me so I can see your creation.

Keren x

⋙ Original post published in December 2016. Updated with video in September 2017 ⋘