Stuffed Capsicum With Quinoa

Review: Aussie Farmers Direct WW Freshbox

Shopping for groceries can be a bit time consuming. As for me, I often go without any plan and would end up buying things I don’t need in spur of the moment! Fortunately, a few weeks ago I had the opportunity to try the new Aussie Farmers Direct WW Freshbox – a delivery box of fresh produce and all the ingredients you need to prepare a healthy meal according to the Weight Watchers-friendly recipes included with the box. It has helped me see the benefit of meal planning and realise how much time I actually spend shopping for groceries every week. A lot!

They currently don’t have a vegan subscription box :( so I tried their vegetarian box. Since my boyfriend Nat is mostly vegetarian, the vegetarian box worked well for both of us. Nat is probably 80% vegan, 10% vegetarian, 9% pescatarian and 1% flexitarian (generally when under duress at certain family dinner events). I think he’s doing very well all things considered. So far we’ve kept our kitchen meat-free and I’m very pleased with that.

My Experience

When the box came I was pleasantly surprised by how much fresh produce it contained. Fresh vegetables, herbs, spices and grains took up about 80% of the box’s contents. The remainder was half a dozen of eggs, a small packet of Parmesan cheese and a few mini-cartons of long life dairy cream. I picked up the box from the front of the apartment around 9 am. They dropped the box very early in the morning, around 3 am or so, But everything was still cool and fresh thanks to the well-insulated box and cool-packs inside.

The box came with three recipe cards. I honestly didn’t think I’d actually use them. I hardly use recipes when cooking and I often like to wing it as I go. I was even thinking that it could be a fun mystery box challenge. However, as soon as I looked at some of the recipes, I just had to try them. They looked so sumptuous and simple and since I had got all the ingredients already, it was a no brainer. They also are easily veganised, which was a huge plus.

Stuffed Capsicums with Rocket and Fennel Salad (recipe at the bottom of this post)

Sweet potato dahl

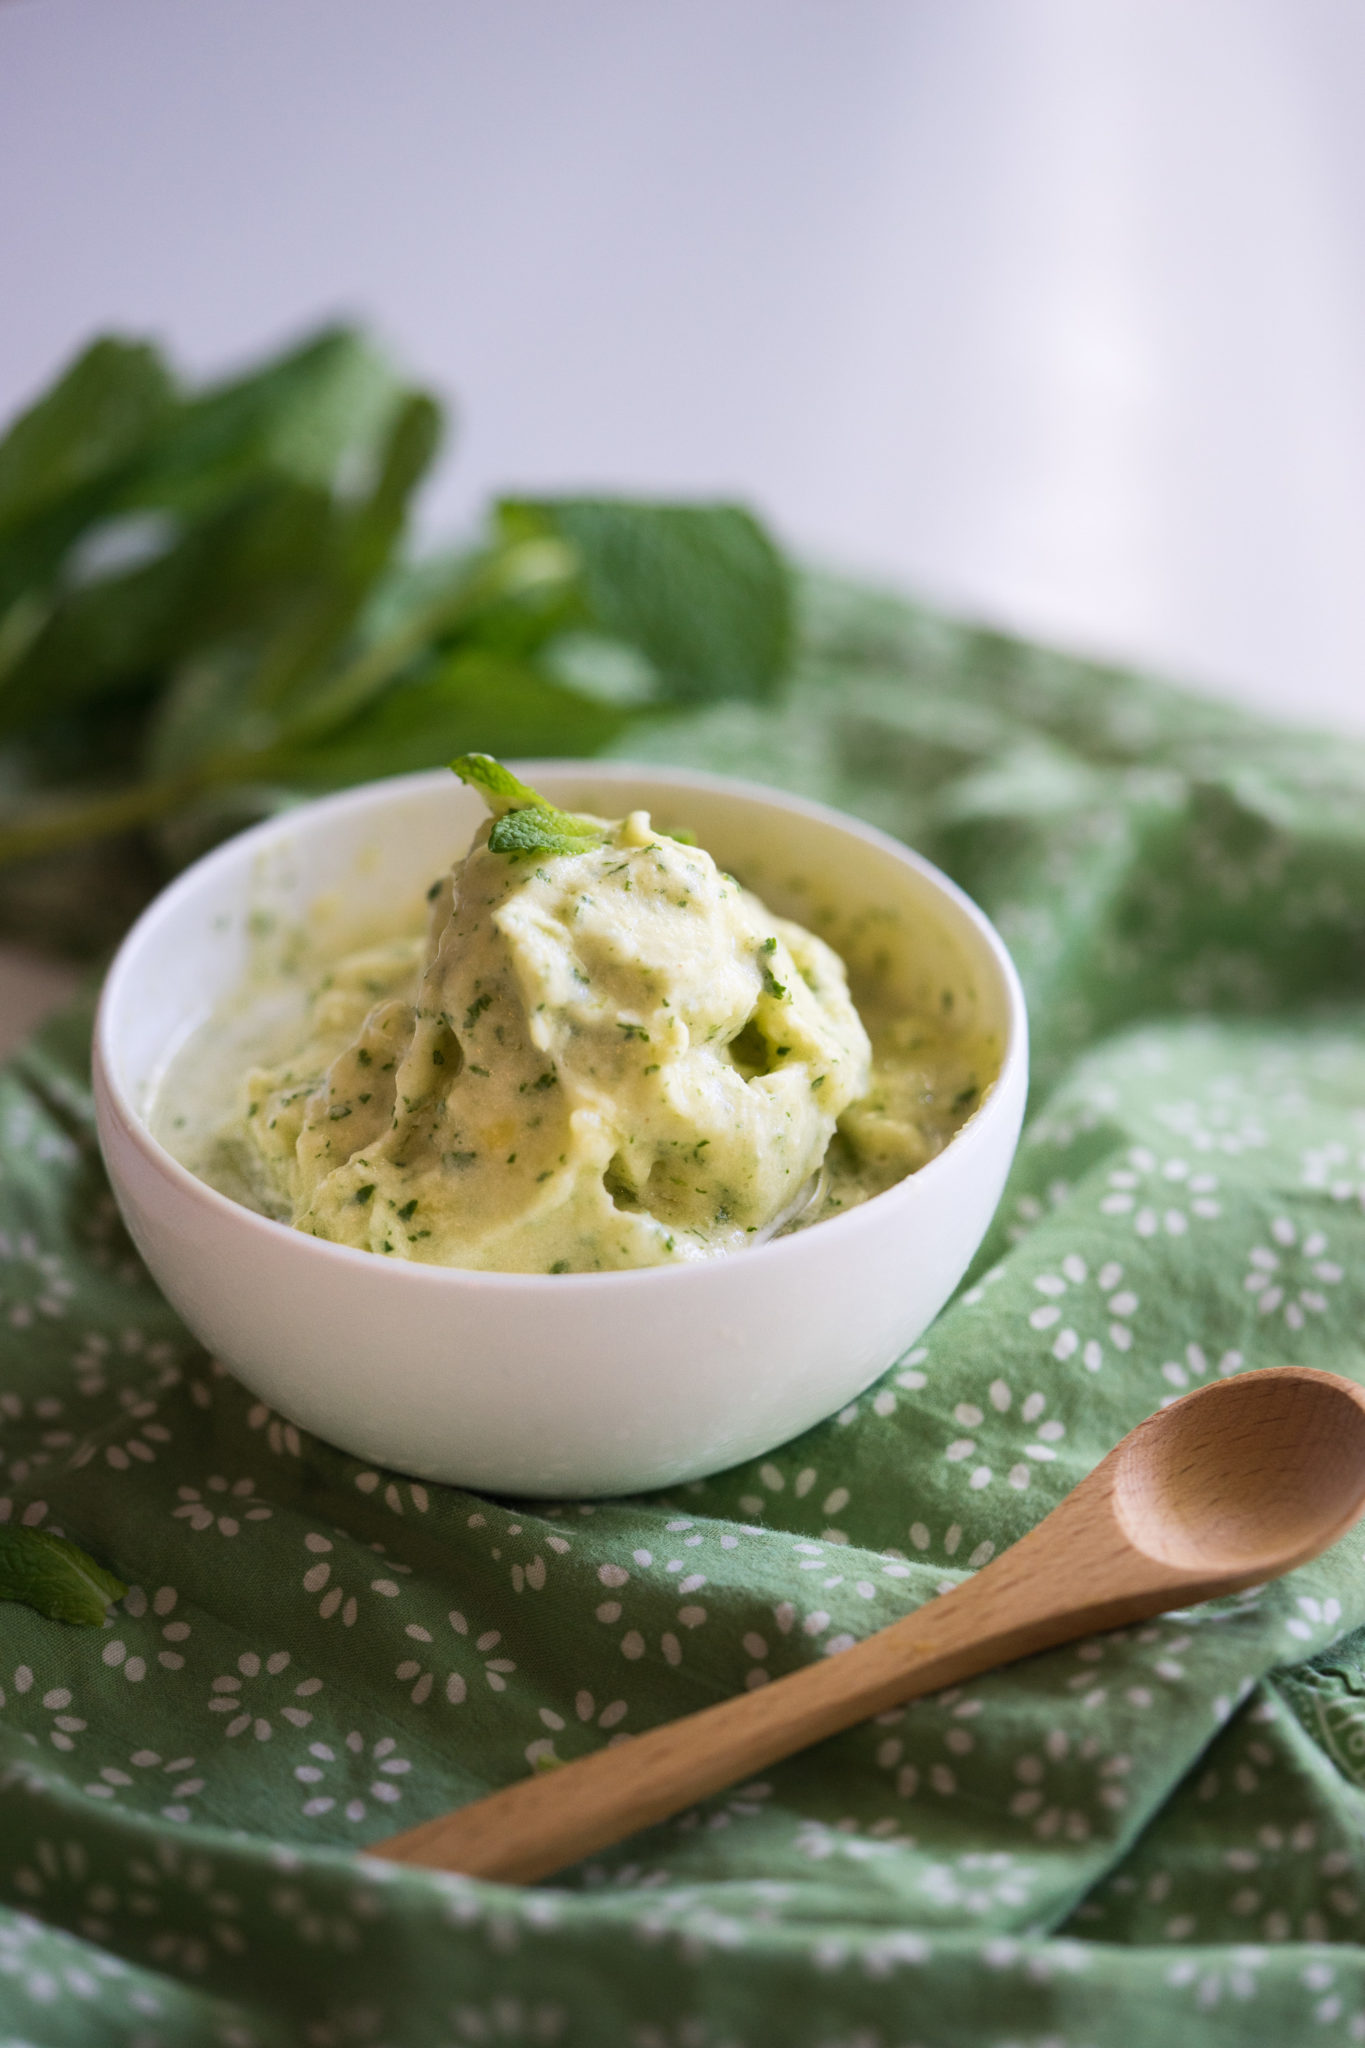
YUM! They were absolutely delicious and easy to make. I really liked the stuffed capsicum – the top layer of quinoa stuffing becomes crunchy after baking which adds a nice texture to the overall dish. I got a bit excited that I made the sweet potato dahl while waiting for the capsicum to cook. It was a feast!

PROS and CONS

I never really got into the whole food subscription trend but now that I’ve tried it myself, I can definitely see the benefits. The problem with home cooking is that even if you enjoy cooking, sometimes you don’t have time to do grocery shopping or meal planning. Services like the Aussie Farmers Direct WW Freshbox help alleviate the stress of finding something new to cook and the hassle of grocery shopping. It’s also quite affordable. For the box I tried (three meals for two people each), it cost $64 per box, so it works out to $10.67 per plate. Not bad, considering the amount of time you save not having to think about what’s for dinner, or going grocery shopping. It’s also considerable cheaper than eating out (not to mention healthier).

There are a few inherent risks associated any food subscription service:

  1. You need your house/unit secure enough to allow your subscription box to be left attended outside your door for a few hours. I had no problem with the first deliveries but this is definitely something that you’d need to consider. In saying that, because the delivery time is ridiculously early (around 3 am), the chance of it being stolen between 3 am and, say, 7 am, is fairly low if you’re in a secure building.
  2. Product deterioration due to heat. There’s a risk of having the fresh produce deteriorating due to the heat, especially in the hot summer days we’re having nowadays. The coolpacks and the well-built cardboard box can keep the produce cool for a few hours but no more than that. To avoid deteroriation you will need to remember to take your box inside and move the fresh ingredients into the fridge as soon as you can.
  3. Product damage from shipping and handling. A small risk but a risk nonetheless. The box is very well built and ingredients are packed securely inside. However, there’s a chance that one of the eggs might break (in fact, one did in my first box) during delivery – in which case, the cost would be refunded to the customer. It wasn’t a biggie for me since I don’t eat eggs. More reason to have vegan box, perhaps?

Final words

Overall, my experience with the WW Freshbox and their support team has been pleasant! I was surprised how much time I’ve saved – enough for a couple of yoga sessions (or perhaps a few extra episodes of Breaking Bad!).

Recipes

Here are a couple of recipes adapted from the WW Freshbox Vegetarian Recipes. Check out Aussie Farmers Direct for more info on their WW Freshbox. They also have other products such as the Fruit & Veg Box – pre-packaged fresh fruits and vegetables which are also available in an organic range. All of their products are ethically and sustainably sourced from local Australian growers so you know that your money goes toward supporting your fellow Australians.

Stuffed capsicums with rocket & fennel salad

A healthy hearty meal perfect for any day of the week. Adapted from WW Freshbox Recipe. The quinoa filling yield a crunchy top after baking making it even more delightful to eat.

Stuffed Capsicum

  • ½ cup 100g quinoa
  • 1 tbsp olive oil
  • 3 green shallots (sliced)
  • 2 garlic cloves (crushed)
  • 1 tsp finely chopped fresh thyme (plus extra to garnish)
  • 400 g can four bean mix (rinsed and drained)
  • 40 g raw almonds (chopped)
  • 4 800g red capsicums

Salad

  • 1 fennel bulb (thinly sliced)
  • 60 g baby rocket
  • 30 g vegan parmesan (optional)
  • 2 tsp red wine vinegar
  • 1 ½ tsp extra virgin olive oil
  • ¼ cup slivered almond
  1. Preheat oven to 200°C. Line a large baking tray with baking paper.
  2. Rinse and drain quinoa. Cook in a large saucepan of boiling water for 12 minutes or until tender. Drain under cold water then transfer to a large mixing bowl.
  3. Meanwhile, heat half the oil in a medium non-stick frying pan on medium. Add shallot and garlic and cook, stirring, for 1 minute or until softened. Add to quinoa with thyme, four bean mix and almonds. Season and toss to combine.
  4. Cut capsicum in half lengthways and remove seeds and membrane. Fill with quinoa mixture. Place on the lined baking tray and cover loosely with foil. Bake for 30 minutes or until capsicum is tender. Uncover and cook for another 10 minutes or until golden.
  5. To make the salad: Combine fennel, rocket and parmesan in a bowl. Drizzle with vinegar and remaining oil.

Sweet Potato Dahl
Recipe Type: Main
Author: Keren
Prep time:
Cook time:
Total time:
Serves: 4
A warm and comforting meal that is simple to make, yet hearty and delicious. The best thing is, you only need one pot to make it. Adapted from [url href=”https://www.weightwatchers.com/au/healthy-recipes/sweet-potato-dhal”]WW Freshbox Vegetarian Recipe[/url].
Ingredients
  • 1 cup (200g) dried red lentils, rinsed, drained
  • 300g sweet potato, cut into 2 cm pieces
  • 3 cups water
  • 1 vine-ripened tomato, chopped
  • 1 tbsp coconut oil
  • 1 brown onion, finely chopped
  • 3 garlic cloves, crushed
  • 2 tsp finely grated fresh ginger
  • 1 fresh red chilli, finely chopped
  • 2 tsp ground cumin
  • ¼ cup chopped fresh coriander leaves, plus extra to garnish
Instructions
  1. Heat coconut oil in a large pan over medium heat. Add onion. Stir for 5 minutes or until translucent. Add garlic, ginger, chilli, cumin and stir for 1 minute or until fragrant.
  2. Place lentils, sweet potato, tomato and water. Bring to the boil.
  3. Reduce the heat and simmer, stirring occasionally, for about 20 minutes or until lentils are tender and mixture is thick.
  4. Stir in chopped coriander. Season with salt and pepper.
  5. Serve with extra coriander.

Have you used any food subscription services before? What do you think?

Vegan Carrot Cupcakes

Happy New Year, everybody! It’s good to be back blogging again. Even though I only missed last week’s blogpost schedule, it feels like ages since I shared a recipe. I hope this vegan carrot cupcakes makes up for it, though; as they’re really good!

It’s been rather a crazy few weeks as I moved house during the Christmas/New Year break. I’ve survived the ordeal, much like a survivor of a plane crash (except I now have to make the crash site somewhat livable). It’s getting there… slowly.

Our kitchen is being ripped out next Monday and so I will have to find a temporary place to cook and clean. Between you and me, I think it is going to be the laundry. I really don’t know what to expect during the renovation except that it’s going to be a hectic few weeks and I won’t have a proper kitchen for around four weeks (which is a pretty big deal).

Nevertheless, despite the inconvenience of having my ‘creative space’ being torn asunder, I thought it would be a perfect opportunity for me to go through some of my draft posts and recipes from 2015 – 2016 which I had planned on publishing one day. Well… that day has come. I declare this year to be my year of backlog clearing, goal kicking, and extreme productivity. *Fist pump*

And so let’s kick off 2017 with this lovely recipe: delectable vegan carrot cupcakes, which has been adapted from my old and trusted carrot cake recipe I used for a number of years before I became vegan. It was really easy to ‘veganise’ the recipe. Butter was replaced with coconut oil, chicken egg with egg replacer, baking soda and vinegar for instant leavening action, and poof… you get soft and moist cupcakes that will make your mother proud. Isn’t science wonderful?

I’m sharing two methods today: Manual method and the Cuisine Companion method which can be adapted for the Thermomix. I normally use the manual method for most of my cakes, but when it comes to grating carrots and chopping nuts, I can get a little bit lazy. This is where my CC earns its keep – grating, chopping, and mixing my ingredients all in one bowl. You can also use a normal food processor for the chopping and grating if you wish, but there’s also nothing wrong with a bit of elbow grease.

Here’s to an amazing 2017!

Vegan Carrot Cupcakes

Wet Bowl

  • 2 medium sized carrots (200g peeled and finely grated)
  • 1 cup walnuts (finely chopped)
  • 1 cup raisins
  • 4 tsp egg replacer (I use <a href="http://www.orgran.com/products_/">Orgran Egg Replacer</a>)
  • 6 tablespoons of water
  • 1 tablespoon apple cider vinegar
  • 2/3 cup refined coconut oil (melted)
  • 1/2 cup sugar

Dry Bowl

  • 1 1/3 cups plain flour
  • 1 1/2 tsps baking soda
  • 1 tsp baking powder
  • 1/2 tsp ground cinnamon
  • 1/2 tsp ground nutmeg
  • 1/2 tsp ground allspice
  • 1/2 tsp salt

Coyo Frosting

  • ½ cup coconut yogurt
  • 2 tsps maple syrup

Manual Method:

  1. Preheat the oven to 180 C. Line a mini muffin pan with paper cups or spray with oil.
  2. Prepare your wet bowl mixture. Whip together egg replacer with 6 tablespoons of water until it’s thick and creamy. Add oil and blend until combined. Transfer to a big bowl.
  3. Add carrots, walnuts, raisins and sugar. Stir to combine.
  4. Sift flour, sugar, baking soda, baking powder, spices and salt together in a large bowl.
  5. Add the wet mixture to the dry mixture and stir until just combined. Don’t overmix.
  6. Pour batter into the prepared mini muffin cups until 2/3’s full.
  7. Bake cupcakes in the preheated oven until a toothpick inserted into the middle of a cupcake comes out clean, about 12 minutes.
  8. Set aside to cool completely. Serve with some Coyo frosting if desired.

Cuisine Companion Method:

  1. Preheat the oven to 180 C. Line a mini muffin pan with paper cups or spray with oil.
  2. Chop carrots using Superblade using speed 10, 1 minute.
  3. Add 1 cup walnuts, chop at speed 7, 20 seconds.
  4. Add 1 cup mixed fruits, mix at speed 7, 10 seconds.
  5. Add flour, spices and salt.
  6. Whisk together egg replacer and water until it’s thick and creamy.
  7. Add wet ingredients to dry ingredients and mix at speed 9, 20 seconds.
  8. Pour batter into the prepared mini muffin cups until 2/3’s full.
  9. Bake cupcakes in the preheated oven until a toothpick inserted into the middle of a cupcake comes out clean, about 12 minutes.
  10. Set aside to cool completely. Serve with some Coyo frosting if desired.

Note: If you’re using Cuisine Companion, you don’t have to grate the carrots or chop the walnuts.

DID YOU MAKE THIS RECIPE?

Please let me know how it turned out for you! Leave a comment below and/or share a picture on Instagram and tag me in the picture.

Keren x

Ginger Bread Donuts

Hey guys… guess what. I made some ginger bread donuts for Christmas. And yes… I’m not the world’s best glazer, so excuse the messy glaze.

But they are delicious!

If you haven’t noticed already, baked donuts are my latest obsession. Any excuse to make them and experiment with different flavours.

If you know me well, I don’t normally glaze my donuts. I’m just not very good at glazing and I’m too impatient for the task. But since it’s Christmas, I’m making a special effort to glaze. Not with your typical sugary glaze though – I just couldn’t bring myself to dip these beauties into a bowl full of icing sugar. Can you guess what I use instead?

How about coconut yogurt mixture! Yep, these ginger bread donuts are covered in creamy, delicious coyo glazing. An unusual combination which amazingly…works! The richness and the slight tartness of the coconut yogurt glaze gives a nice balance the sweetness of the donuts. Yum!

Ginger Bread Donuts

A delicious Christmas treats for everyone. Oil-free, refined sugar free, and can be easily made gluten-free.

Donut Batter

  • 2 cups plain flour (or gluten-free flour for gluten-free version)
  • 1 1/2 cups coconut cream
  • 1 cup soy milk
  • 1/2 cups coconut sugar
  • 1/2 tsp ginger
  • 1/2 tsp cloves
  • 2 tsp cinnamon
  • 1/2 tsp salt
  • 1 tsp baking powder
  • 1/2 tsp bicarb soda
  • 2 tbsp ACV

Coyo Glazing

  • 1/2 cup coconut yogurt
  • 1 tsp vanilla extract
  • 2 tsp maple syrup
  1. Preheat the oven to 180 C.
  2. In a large bowl, combine the dry ingredients with a whisk to mix thoroughly. Combine the wet ingredients in a small bowl.
  3. Mix wet ingredients to dry ingredient and then pipe mixture onto mini donut pan. Make sure to fill the pan only to 2/3 full.
  4. Bake for 10-12 min until a toothpick comes out clean. Allow to cool for couple of minutes, then transfer the donuts onto a cooling rack.
  5. Make the coyo glazing my mixing all the ingredients.


DID YOU MAKE THIS RECIPE?

Please let me know how it turned out for you! Leave a comment below and/or share a picture on Instagram and tag me in the picture.

Keren x

Joyou

Joyou

Imagine getting a surprise delivery present from yourself, for yourself.

Well now you can! There’s a new online gift delivery service with a difference called Joyou. They offer a surprise gift box service for those in need of monthly pampering.

And you won’t know what you’ll get until you open the box. Exciting right!

Last November box I received my first Joyou box. And following is my experience.

It was packaged like a gift, string bow and all. And it smelt really nice.

My surprise gift was…

A deliciously scented vegan body scrub and lip balm from Mud and Co.

YUM!

joyou-1

It’s sustainable, ethical and vegan Friendly

What I love about Joyou is that they ensure all gifts are sourced sustainably and ethically as much as they can, and that is awesome. As a vegan, it’s always a hassle to check if the product is cruelty-free but with Joyou, I don’t have to.

joyou-4

Perfect for the ladies

Joyou is all about feminine, pretty, and beautiful surprises, so it is perfect for the ladies! The Mud & Co lipbalm I received smells divine and feels so luscious I can’t think of any girls who wouldn’t want to have it.

joyou-6

No need to subscribe

I think this is the best thing about Joyou. You don’t have to subscribe to get your box (though you can if you want to). Just order one whenever you feel like a bit of treat. Perfect for the commitment-phobic customer, me included.

So ladies, if you’re looking for a bit of pampering and love a beautiful surprise gift that is sustainably-sourced, ethical and cruelty free, then you need to check out Joyou. They’re going to be big, I tell ya!

Keren x


Pina Colada Nice Cream

Summer is coming and I can’t wait to start making cold desserts again!

And now that I am a proud owner of the Vitamix, I can make all sorts of delicious thick nice cream without worrying that my blender will break. The recipe I’m sharing today is Pina Colada Nice Cream. It’s like a healthier, non-alcoholic version of frozen Pina Colada. And it’s super delicious.

pinacolada-nice-cream-1Even though I absolutely adore my Vitamix, I still have a soft spot for my Breville blender. It’s been so reliable that I’m rather sad of the fact that I have to retire it. But I’m not throwing it away completely. I’m keeping it for other non-food hobby projects that require a blender (like making skincare products or candle wax).

Anyway, here’s a quick and easy nice-cream recipe, which you can make without using an ice-cream maker. You just need a blender. You don’t even need a power blender!

pinacolada-nice-cream-11

And if your blender is struggling, just add some extra water a little at a time to ‘help’ your blender process the frozen fruits.

It’s mildly sweet, rich, creamy and minty. Everything I like in an ice cream. It’s really good! I hope you try it.

Pina Colada Nice Cream

Pina Colada nice cream

  • 1 1/2 cup diced pineapple (freeze overnight)
  • ½ cup coconut water (I use <a href="https://rawc.com.au">rawc</a>)
  • ½ cup coconut milk
  • 3 sprigs of mint (about 20 leaves)
  1. Add all the ingredients into a blender.
  2. Blend.
  3. Garnish with some fresh mint leaves and serve immediately

pinacolada-nice-cream-3

Did you make this recipe?

Please let me know how it turned out for you! Leave a comment below or share a picture on Instagram and tag me so I can see your creation.

How to make vegan mayonaisse

You’re in for a treat. I’m going to show you how to make vegan mayonnaise.

When I first became a vegan I thought I would never be able to have mayonnaise again and that I would have to kiss aioli goodbye. And for a while, that was the case… until I came across some vegan mayonnaise brands at the Cruelty-free Shop, which contain no eggs, but taste just like a regular mayo, like this one and this one.

This discovery completely changed my life. My veggie burger became a lot more exciting and salads were transformed.

Best Vegan Burger

Problem is, these vegan mayonnaises can get a bit expensive at the store.

But it turns out that you can make egg-free mayonnaise at home, easily, using soymilk and oil. This is my go-to recipe for home-made mayo that is unbelievable good. It’s from the Miyoko Schinner cookbook – The Homemade Vegan Pantry (a must have if you want to level up your vegan cooking skills).

The secret to making delicious vegan mayo.

Firstly, you need kala namak – an Indian salt that lends an egg-y flavour to the mayonnaise. You can find it on Amazon, in health food stores or Indian grocery stores. It’s pinkish in colour and it’s a great ingredient to have if you want to lift your game in the vegan-cooking department.

Secondly, you need lecithin to aid the emulsification process. Here’s a bit of kitchen science for you: Mayonnaise is an emulsion (a mixture of two liquids that normally can’t be combined, such oil and water). In mayonnaise, emulsification is achieved by slowly adding oil into soymilk while the blender is running. This mixing process disperses and suspends tiny droplets of oil and milk throughout each other. In it’s normal form, the emulsion is unstable, which is why we have added lecithin. Lecithin is an emulsifier that helps holds the mixture together and prevents it from separating.

If it sounds a bit too much right now, don’t worry, once you start blending, everything will start to make sense.

vegan-mayonnaise

How to make vegan mayonnaise (Makes 1 jar)

Ingredients:

  • ½ cup soy milk
  • 1 tbsp English mustard
  • 1/2 tbsp apple cider vinegar
  • ½ tsp kala namak salt
  • 4 tsp lecithin granules
  • ½ tsp sugar optional
  • ½ – 1 ¼ cup canola oil

Instructions:

1. Add all ingredients except canola oil into a blender and blend on medium high speed.
2. Drizzle canola oil in a very thin stream while the blender is running until it becomes thick and creamy. It may take up to 4-5 minutes for this to happen (and it will happen suddenly) so you have to trust the process. Three words – ‘steady thin stream’.
3. Transfer to a clean glass jar and store in the fridge for up to a month.

Variation – Garlic Mayonnaise

Ingredients:

  • ¼ cup mayonnaise
  • 2 large garlic cloves, finely minced
  • 1 teaspoon fresh lemon juice
  • 3 tablespoons olive oil

Instructions:

  1. Blend all ingredients together

Did you make this recipe?

Please let me know how it turned out for you! Leave a comment below or share a picture on Instagram and tag me so I can see your creation.

Keren x

Bowral and the Southern Highlands

There’s nothing I love more than a short trip to the countryside, especially when food and wine are involved. As I started writing this post, I just came back from a two-day weekend trip to the Southern Highland, about two hours’ drive south from Sydney. It was the Labour Day long weekend and one of Nat’s old friends from Melbourne came up for a wedding in nearby Moss Vale so we thought it was the perfect opportunity to check out Bowral and the Southern Highlands region.

It was lovely. I didn’t expect it to be so beautiful and memorable. The route was very picturesque; the town was full of gorgeous country houses; the people were friendly; and the atmosphere was very relaxing. Everything just seems to move at a slower pace here.

grid-photo-2-1We stayed at a gorgeous dog-friendly accommodation in Exeter called the Woodland Studio. It’s a stylish, freshly refurbished two-bedroom bungalow in a lovely farm filled with beautiful trees, sheep and even an alpaca! Missa (my 9 year old spoodle) loved the place. (Except when she was tied up to a tree when we were feeding the lambs).

alpaca-and-sheeps-29

alpaca-and-sheeps-24

Seriously, how cute are these baby lambs!

alpaca-and-sheeps-35

Hello there…

alpaca-and-sheeps-38

We went to Bendooley Estate and had lunch at their restaurant, which is inside a beautiful book barn (apparently it’s the original Berkelouw’s site?). It is situated in a gorgeous location, among rolling hills just outside the town of Berrima. We sat outside as we had Missa with us. We got ourselves a table next to the log fire, which was good, as it was cold and windy, but we avoided rain, so we were lucky.

bendooley1

The menu had a good list of vegetarian dishes – we ordered two (an entrée and a main) and a bowl of fries to share. They arrived looking amazing as expected, however, the fries out-portioned both of the ‘proper’ dishes so much than it felt like were eating fries with veggies on the side, instead of the other way around. Nevertheless, the food was delicious.

bendooley-estate-31

After lunch we visited the book barn inside the restaurant. It was a bit smaller than expected (apparently it used to be much bigger), but it had a lot of quirky books. I imagine that it would be very easy to get lost among the bookshelves as they have so many books (both second-hand and new) across so many different genres and categories, from military books, to ancient Greece history, to needlework, there’s a bit of everything.

As nice as lunch was, the highlight of our day was dinner at Biota Dining in Bowral. I’ve wanted to go to Biota ever since 2012 (back when I was a fine dining aficionado) so when Nat told me we were going there I was over the moon.

1

So we went, and we wined and dined and we had a good time. Biota is pretty similar to Sepia in Sydney’s CBD in that they don’t reveal their dishes until they’re being served – ‘the chef likes to keep it a surprise’ said the waiting-staff. I’ve never understood this, but as long as they were able to give me vegan options (which they did – thank you, Mister Chef), I was happy. And the food was really good! Definitely worth the trip.

2

3

And to top of the weekend, there was a Food and Wine Festival taking place at the same time. Call it a fortuitous coincidence but I believe there’s a reason for everything. And in this instance, I think the universe wanted me to taste Banjo’s Run exquisite drop of wine. And, boy, are they good. Really good. There was one particular bottle that I absolutely loved and I’m not even going to tell you which one because I have a cunning plan of buying all their stock so I can keep them all for myself and live happily ever after. Seriously though, it was that good! Sorry, I have no pictures of the festival, but I am working on a video clip of my trip so stay tuned!

But let me tell you. festival was filled with lots of delicious wines (luckily, because the food wasn’t that vegan-friendly) and it was really hard for me to keep my wallet in my pocket! So I employed my rule of three: that is, to limit myself to just three bottles of wines. So I went and bought three.

It was one of the most relaxing trips I’ve had in a long time. Spending time with people you love, enjoying the relaxed and laidback countryside, eating delicious local foods, and feeding lambs and an alpaca on the side. That my friend, is what I call – a great weekend!

Hope you’re having a good weekend too!

Keren x

P.S. Here’s a couple of videos I made during my trip to Bowral and the Southern Highlands. Hope you like it.

[embedyt] http://www.youtube.com/watch?v=XZxy9Mfjkm8&width=1500&height=873[/embedyt]

[embedyt] http://www.youtube.com/watch?v=rPP70-uz-Xo&width=1500&height=873[/embedyt]

Mushroom Risotto with Black Truffles

Oh, those little black gold nuggets… A couple of months ago I impulse-purchased a couple of black truffles from The Truffle Farm because, well, (a) they were in season and (b) I’m weak around fine foods… like… completely helpless! So I made this dish –  Mushroom Risotto with Black Truffle.

Vegan Mushroom Risotto With Black Truffle

Mushroom risotto and black truffle is like the perfect marriage made in foodie heaven I think.

I got a bit nervous (like pretty much every time I make risotto). Did I add enough stock? Did I add too much stock? Is the flavour okay? Is it going to be soggy or too dry?

I just wanted it to be good.

Because..

I can’t live with a bad risotto – at least not from my kitchen.

Vegan Mushroom Risotto With Black Truffle

But it turned out beautiful! I don’t know why I worried so much. It was creamy, perfectly al-dente and the flavour of Swiss brown mushrooms…. man, it really made this dish shine. And the thinly shaved truffle… sprinkling it all over the dish was almost like making that crunchy caramel top of crème brulee, it made the dish perfect.

This dish is rich, comforting, and full of the earthy and savoury flavours that I adores so much. I also added a sprinkle of vegan parmesan, and just like that – magic happened.

mushroom-risotto-2

Making risotto requires patience. You have to stand there in the kitchen for almost an hour just stirring the thing. But I guess that’s why it tastes so good – because of all the love you put into it. I’m lucky enough to have a Cuisine Companion, a cooking machine that cooks and stirs at the same time, so I don’t have to go to so much trouble. But I’ve made risotto without it before and it wasn’t too bad, as long as your heart’s in it. Besides, that’s how people have made risotto for years – in a saucepan, over a stove.

Vegan Mushroom Risotto With Black Truffle

Mushroom Risotto with Black Truffles

Ingredients

  • 2 cups Arborio rice (I use SunRice brand)
  • 1 large brown onion, diced
  • 4 garlic cloves, diced
  • 200g Swiss brown mushroom, sliced to 1cm thickness
  • ¼ cup extra virgin oil
  • 1/3 cup white wine
  • 5 cups vegetable stock
  • ¼ cup vegan parmesan
  • 20 gram black truffles (or you can substitute with truffle oil)
  • 1 tablespoon vegan butter (I use Nuttelex)
  • 1 tsp salt
  • pepper

Cuisine Companion Method: 

  1. Place in the bowl fitted with the mixer. Add the oil and onion and launch the P1 slow cook program without the stopper for 3 mins.
  2. Add the rice then launch the P1 Slow Cook program without the stopper for 3 mins. Add white wine and relaunch for 1 min.
  3. Add the vegetable stock stock and launch the Slow Cook Program P2 at 95°C for 15 mins without the stopper.
  4. Meanwhile slice mushroom to 1cm thickness.
  5. Add mushroom at the end of the 15 minute program and then relaunch for 5 minutes.
  6. Add the vegan parmesan, salt, butter and gently mix. Adjust the seasoning.
  7. Sprinkle with shaved black truffle or drizzle with black truffle oil.

Manual Method:

  1. Place stock in a saucepan over medium heat. Cook until mixture starts to simmer. Turn the heat to low and cover to keep hot.
  2. Heat oil in a large heavy-based saucepan over medium-high heat. Add onion and cook for 3-5 minutes or until onion has softened.
  3. Stir in rice into the cooked onion. Cook, for 1 to 2 minutes or until coated. Add wine. Stir for 30 seconds or until wine has absorbed.
  4. Add ½ cup of hot stock to rice mixture. Cook, stirring, until stock has absorbed. Repeat with remaining stock, ½ cup at a time.
  5. Add sliced mushroom after adding the last cup of stock and cook until liquid has absorbed and rice is tender.
  6. Remove pan from heat. Stir in spinach, parmesan and butter. Set aside, covered, for 2 minutes. Season. Serve with grated parmesan.
  1. Add the vegan parmesan, salt, butter and gently mix. Adjust the seasoning.

Tips:

  • Infuse the rice with the black truffles for five days for a boost of truffle flavour.
  • You can shave truffles using a cheese shaver or a vegetable peeler.

Vegan Mushroom Risotto With Black Truffle

Did you make this recipe?

Please let me know how it turned out for you! Leave a comment below and/or share a picture on Instagram and tag me :)

Big love,

Keren

Flourless Vegan Chocolate Cookies

A couple days ago I attempted to make a vegan ‘brain’ lemon jelly for Halloween. It was an epic fail. L I’m not sure if it was the mould I was using, or the ingredients themselves. I used lots and lots of lemon juice, which may have interfered with the gelling nature of agar-agar. It just didn’t set! So I made these instead – charcoal, heart-shaped flourless vegan chocolate cookies. In hindsight I’m glad I failed the brain jelly experiment because this is, frankly, much better.

The cookie texture was almost wafer-like, with crunchy bits from the seeds and the gooey chocolate surprise here and there. They’re flourless, gluten-free, refined-sugar free (if you’re using sugar-free chocolate), and the best thing about them is they do taste like cookies!

These are not your typical Halloween treats but they look the part and, hey, you don’t come to my blog and expect the usual cookie recipes, do you?

flourless-vegan-chocolate-cookies-9-2

The secret ingredients + tips to making the perfect cookies

Instead of using flour we’ll be using our secret ingredient – black beans. You will need a whole can of black beans for this recipe but you can also use dried beans. If you’re using dried beans, you’ll need to make sure you cook them until they’re soft enough that you can squish a bean with your fingers without much effort.

Note that because I wanted to make my cookies as dark as possible for Halloween, I used Dutch pressed cocoa, black tahini and black sesame seeds. You can use normal cocoa powder, white tahini and sesame seeds if you wish. Or you could replace the tahini with peanut butter and use nuts or dried fruit instead of the sesame seeds. Get creative. You won’t break the recipe, I promise.

flourless-vegan-chocolate-cookies-21

I used a five-centimetre heart shaped cake cutter with a pressed lid, but you can also use the back of the spoon to flatten the dough. The thinner the cookies (less than 5mm), the crispier they will be. I recommend baking a test batch before committing to a particular thickness. I like mine a little bit soft so I made my cookies slightly thicker.

Another thing to consider is that these cookies won’t spread during baking so you can place them fairly close to each other and fit more on the one pan.

So are you ready to make healthy, protein-rich, flourless vegan chocolate cookies that are cool enough for Halloween, and taste great too?

You know you are!

flourless-vegan-chocolate-cookies-15-2


Flourless Vegan Chocolate Cookies

  • 1 can (400g of blackbean (or 1 ½ cup cooked beans), drain and rinse)
  • 1/3 cup Dutch pressed cocoa powder
  • 1/3 cup dark chocolate (finely chopped (I use Chocolate Counter))
  • 1/2 cup coconut sugar
  • 2 Tbsp. coconut butter or coconut oil
  • 2 Tbsp. black sesame seeds
  • 2 Tbsp. chia seeds
  • 1 Tbsp. black tahini
  • 3 Tbsp. water
  • 1 tsp. vanilla extract
1/3 cup chopped dark chocolate
  • ¼ tsp. sea salt (plus extra for sprinkling)
  1. Preheat oven to 180°. Line a baking sheet with non-stick baking paper.
  2. Mix chia seeds and 3 Tbsp water in a bowl and set aside for 5 minutes.
  3. Place beans, coconut butter, cocoa powder, sugar and salt in a food processor and blend until well combined. Transfer to a bowl.
  4. Add chopped chocolate and mix to combine.
  5. Spoon cookie batter onto the lined baking sheet (or cake presser). Flatten top of cookies slightly using the back of the spoon (aim for less than 5mm thickness). Note that they will not spread when baking.
  6. Sprinkle with extra sea salt. Bake for 15 minutes. Let cool on cooling rack and enjoy!

Did you make this recipe?

Please let me know how it turned out for you! Leave a comment below or share a picture on Instagram and tag me so I can see your creation.

Keren x

Maker Sydney – Behind The Kitchen

Two of my favourite vegans: Annabelle of My Little Panda Kitchen and Kate of The Vegan Teahouse have paired up to create a sweet spot called MAKER. They offer a 100% vegan shared commercial kitchen space with a take-away coffee and treat bar, plus a soon-to be launched cafe serving up seasonal vegan gourmet comfort food.

dsc09837

maker-sydney

I went and visited their kitchen a couple of weeks ago and had the pleasure of speaking to Kate about their new cafe venture as well as seeing the making of The Vegan Teahouse popular Grace Chocolate brownies and Britney banana bread.

dsc09828

dsc09832

They just launched their take-away coffee and treat bar last Saturday and judging by the huge line at the door, I have a feeling that Maker is going to be hit amongst plantbased foodies in Sydney.

Here’s a sneak peek.

Big love,

Keren x