Vegan Sweet Potato Blondies

A little comfort food sometimes go a long way. Especially when it’s this good. I made these Vegan Sweet Potato Blondies during the Christmas break in place of gingerbread men and boy did they change my life.

sweet-potato-blondie-17

These are sweet, comforting, and every bit delicious… this recipe is an adaption of Sweet Potato Blondies recipe from Vegan Cookies Invade Your Cookie Jar (awesome cookbook by the way!) – I’ve reduced the amount of sugar, double the amount of spices and included coconut cream to make them slightly less sugary and more nutritious. And the result, boy oh boy…. everyday is Christmas as far as these bars concern.

sweet-potato-blondie-20

Why I love these blondies

First of all I love sweet potatoes. I think they’re superfood – rich in fibre, beta-carotene and vitamin A.  They also contain lots of antioxidants and anti-inflammatory nutrients. The spices thrown in the mix (cinnamon and ginger) are also great for digestion, cold, flu, and pain relief among other benefits.

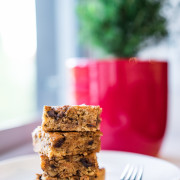
These are super easy to make and the result is nothing short of spectacular. They’re mildly sweet, moist, spicy and decadent. Best of all, they’ll make your house smell like Christmas morning. These are beautiful when warm but they also make a delicious cold snack. I highly recommend serving with a scoop of vanilla ice cream.

sweet-potato-blondie-25


Vegan Sweet Potato Blondies
Recipe Type: Dessert
Author: Keren
Prep time:
Cook time:
Total time:
Serves: 6
A delicious bake that will make your house smells like Christmas morning. And no one would be able to guess the secret ingredient that makes this cake so moist and flavourful, sweet potato!
Ingredients
  • Wet Ingredients
  • ¾ cup cooked, mashed sweet potato (skin removed)
  • ¼ cup coconut oil, melted
  • 1/3 cup coconut sugar
  • 1 cup coconut cream (or you can also use coconut milk)
  • 1 tbsp apple cider vinegar
  • Dry Ingredients
  • 1¼ cup plain flour
  • ½ tsp baking powder
  • ¼ tsp salt
  • 1 tsp ground cinnamon
  • 1 tsp ground ginger
  • Topping
  • ½ cup walnuts, chopped roughly
  • ⅓ cup non-dairy chocolate chips
Instructions
  1. Preheat oven to 180ºC. Line a 20 cm (8 inch) square pan with aluminium foil. Make sure foil covers the sides of the pan. Brush or spray the pan with cooking oil.
  2. Arrange walnuts on a cookie sheet in a single layer, bake in the preheated oven for about 5-8 minutes, checking every couple of minutes. Let cool for a few minutes.
  3. Sift the dry ingredients into a bowl. Mix to combine.
  4. Mix the wet ingredients together.
  5. Stir in the wet ingredient into the dry ingredients and mix just enough to moisten the mixture. Do not overmix.
  6. Fold in the chopped nuts and chocolate chips.
  7. Pour mixture into the prepared pan and smooth the top with the back of the spoon or spatula. Bake for 28 minutes. Cake is done if a toothpick inserted into the centre comes out mostly clean (a few moist bits are ok). If it’s still a bit wet, bake for another 2-4 minutes. The key is not to over-bake the cake. Allow to cool for at least 30 minutes for the texture and flavour to develop then slice into bars.
Notes
*You can replace coconut cream with any non-dairy milk.[br]*If you’re super lazy, you can just use chopped raw walnut, they won’t taste as ‘roasted’ but they’ll be just as delicious.

If you make this, I’d love to hear from you. Leave a comment below or find me on Instagram and share your creation. Don’t forget to tag me @passionatelykeren so I won’t miss your post.

Keren x

Vegan French Onion Soup with Mushrooms

Here’s my dairy-free take to the traditional French onion soup. Made hearty and satisfying with the addition of mushrooms.

Why I love this soup

This soup is not only comforting and delicious, but it is also good for you. Both onions and mushrooms are loaded with antioxidants and cancer fighting properties. They also help boost the immune systems and are full of beneficial phytonutrients. Too many big words? Basically, just make this :)

Onion Soup with Mushroom-3

Vegan French Onion Soup with Mushrooms
Recipe Type: Soup
Author: Keren
Prep time:
Cook time:
Total time:
Serves: 4
Delicious, nutritious and satisfying bowl of onion soup with the hearty flavour of Mushrooms.
Ingredients
  • 2 tablespoon olive oil
  • 1 kg brown onions (6 large onion), Peeled & Quartered
  • 350g button or flat mushroom, sliced
  • 2 tbsp tapioca flour
  • 4 tbsp water
  • 4 cups vegetable stock
  • 1 tsp salt
  • 2 tsp muscovado sugar or brown sugar
Instructions
  1. Peel and half onions. Slice thinly with a knife or add to Cuisine Companion bowl and chop for 15 seconds using chopping blade at speed 5.
  2. Replace blade to stirring blade. Add olive oil and saute for 10 minutes at 100 C.
  3. Add stock and cook for 30 minutes at 100 C reduce to speed 4.
  4. Add mushroom and cook for 5 minutes/100 degrees/speed 4.
  5. Mix tapioca flour with 4 tablespoon water to form a smooth paste.
  6. Add tapioca paste to CC bowl and mix for 2 minute / 100 degrees / speed 4.
  7. Serve in soup bowls and season with salt and pepper.
Notes
P.S. If you don’t have Cuisine Companion you can make this on the stove top. Just follow the direction and use large pot to cook the soup, stirring as needed.

Vegan Cinnamon Scrolls With Chai Spice

Sometimes, there’s nothing I want more than a freshly baked vegan cinnamon scrolls.

Vegan cinnamon scrolls

This recipe was a result of one of my spurs of the moment ideas. It was inspired by cinnamon scrolls recipe from The Joy of Vegan Baking by Collen Patrick Goudreau, which, I must say, is a must-have for anyone who loves baking.

Vegan Cinnamon Scrolls

So I was enjoying my second last cinnamon scroll I made a few days earlier over a cup of chai tea. It was soft and tender and it tasted so good and ‘matched’  the Rainbow chai tea I was having. Suddenly an idea came to me. Why not combine the two flavours together? It will be sweet, mildly spicy and nutty. Wouldn’t that be nice?

And just like that, these babies were born.

Vegan Cinnamon Scrolls With Chai Spice

Why I love these Vegan Cinnamon Scrolls:

They’re sweet, mildly spiced, comforting and, best of all, they smell amazing…

Chai spices are known for it’s health benefits, antioxidants and phytochemicals with cancer-prevention properties. It also tastes delicious. Though these scrolls don’t score high on the nutritional scale, it is significantly lower in sugar compare to your regular scrolls (especially if you include the icing glaze on top). Mashed banana is added in the dough mix, which makes the dough mildly sweet. As a result, you don’t need a lot of sugar for the filling and you won’t even miss the glaze. It’s has a delicate spicy taste and did I say it smells amazing?

Vegan Cinnamon Scrolls With Chai Spice 

Ingredients

Yeast Mixture

  • 1 cup non dairy milk
  • 1/2 cup non-dairy butter
    1 teaspoon raw sugar
  •  4 teaspoons of instant dry yeast

Chai Spiced Nut Filling

  • 1/4 cup brown sugar (packed)
  • 1/2 cup walnuts (you can also use other nuts or mixed nuts)I’m 
  • 1/4 cup non-dairy butter (I use Nuttelex)
  • Chai spice:
    • 1/4 tsp ground cloves
    • 1/4 tsp ground ginger
    • 1/4 tsp ground nutmeg
    • 1 tsp ground cardamom
    • 1 tbsp ground cinnamon

Dough mix

  • 5 cups plain flour (separate 1 cup aside)
  • 2 medium ripe banana, mashed
  • 3 tsp egg replacer powder
  • 6 tbsp water
  • 1 tsp sugar
  • 1 tsp salt

Step 1. Proof the yeast

  1.  Combine the milk, butter and sugar in a bowl. Warm the mixture in the microwave for 30 seconds on in a small pot on the stove. The mixture shouldn’t be too hot to put your finger in.
  2. Add the dry yeast into the mixture. Set aside for 10 minutes. You should see foam and bubbles forming on top of the yeast mixture. If not, your yeast may be too old and no longer active in which case, you’ll need get a fresh yeast pack.

Step 2. Prepare your dough

  1. Whip together the egg replacer powder with the water using a fork until it’s thick and creamy.
  2. Using Cuisine Companion with chopping blade: Add 4 cups of flour into CC. Add the yeast mixture and press P2 pastry setting.
  3. Check after 1 minute. If the mixture is too sticky, add more flour 1 tablespoon at a time using the 1 cup of flour you set aside.
  4. Let the program continues until it completes the proofing stage.

Step 3. Prepare the Chai Spiced Nut filling

  1. Prepare CC with chopping blade. Finely chop the walnuts or process in CC into rough crumbs. Speed 5, 15 seconds
  2. Add the remaining ingredients and mix. Speed 5, 5 second.

Step 4. Make the scrolls

  1. Once the dough has risen, fold it out onto a lightly dusted surface and spread out the dough with a rolling pin into a big giant rectangle until the dough is about a ¼ of an inch thick.
  2. Spread the filling around the whole dough. Carefully roll the dough into a log and pinch the edge to seal. Slice into 8 equal pieces.
  3. Leave for another 30 minutes to 1 hour to rise slightly.
  4. Arrange the pieces on a greased baking pan and then pop them in the oven
  5. Bake on 190 degrees Celsius (375 Fahrenheit) for 25-30 min.

Note:

  • You can knead the dough using an electric mixer if you don’t own a cuisine companion. You can also knead the dough by hand if you don’t own an electric mixer.
  • You can also use 2 tablespoon of chai tea mix (the one with dried herbs and spices, not powder) to replace the chai spice ingredients. Ground before using.

Vegan Cinnamon Scrolls With Chai Spice

Did you make this recipe?

Please let me know how it turned out for you! Leave a comment below and/or share a picture on Instagram with the hashtag #littlegreenhabits. I’d love to hear from you.

Halloween Special – Vegan Peanut Butter Pumpkin Pancakes

Peanut Butter Pumpkin Pancake-37

A couple of days ago I found a very old costume from a Halloween party I went to about six years ago. I remember staying up until 3 am to sew my own costume. It was a great night: I rocked it as the Corpse Bride, and even won the best costume award!

Next to being able to walk around in a blue-coloured, blood-splashed wedding gown, Halloween is a great excuse to make and eat anything pumpkin-related! I didn’t want to make yet another pumpkin pie this year so I thought, why not make something for breakfast? And that’s how these Peanut Butter Pumpkin Pancakes were born.

Peanut Butter Pumpkin Pancake-34

Why I love it:

Tender pancakes that are healthy, simple and easy to make. They’re sumptuous and I love how beautiful my kitchen smells when I make these. It also makes an impressive pancake stack for the Instagram fans among you.

Pumpkin is loaded in fibre and antioxidants including beta-carotene, which the body converts into a form of vitamin A. It is also rich in potassium, an important mineral that’s crucial for maintaining normal organ functions. Peanut butter on the other hand is rich in protein, healthy fats and tryptophan. And the pair taste beautiful when put together.

Peanut Butter Pumpkin Pancakes


Vegan Peanut Butter Pumpkin Pancakes
Recipe Type: Breakfast
Author: Keren
Prep time:
Cook time:
Total time:
Serves: 4
Vegan Peanut Butter Pumpkin Pancake
Ingredients
  • Dry:
  • 1 1/2 cup whole wheat flour
  • 1 tsp allspice (pimento)
  • 2 tsp baking powder
  • ½ tsp bicarbonate soda
  • ½ tsp cinnamon
  • ½ tsp salt
  • Wet
  • 1/3 cup packed mashed pumpkin
  • ¾ cup non-dairy milk + 1 tbsp of lemon juice
  • 1 tbsp melted coconut oil
  • 2 tbsp peanut butter
  • 1 tbsp vanilla extract
  • 4 tbsp maple syrup
  • Filling:
  • 2/3 cup packed mashed pumpkin
  • ½ cup peanut butter
Instructions
Cuisine Companion Method:
  1. Combine ¾ cup milk and lemon juice in a large bowl and let rest for 5 minutes to curdle
  2. Prepare Cuisine Companion with the mixing blade, add all the ingredients into a bowl. .
  3. Add remaining ingredients and combine sp 4 / 10 – 30 secs (until smooth)
  4. Let the batter sit for 10 minutes.
  5. Heat up a non-stick pan over low heat.
  6. Add about 1/4 cup of batter to the pan. Cook for 3 minutes, or until the top is looking dry and the edges are dry and firm. Flip over and cook another 2 minutes.
  7. Make your pancake tower using the filling. Place one pancake on plate, layer with 1-2 tablespoon of mashed pumpkin. Place another pancake and layer with 1 tablespoon of peanut butter. Continue until you have a tall stack of pancakes. Top the last layer with mashed pumpkin.
  8. Serve with a generous drizzle of maple syrup.
Manual Method – replace the above step 2-4 with the following:
  1. In one bowl, whisk all the wet ingredients together.
  2. In a second bowl, sift all the dry ingredients together.
  3. Pour the wet ingredients into the dry and stir well until smooth.

Did you make this recipe?

Please let me know how it turned out for you! Leave a comment below and/or share a picture on Instagram with the hashtag #littlegreenhabits. I’d love to hear from you.


Peanut Butter Pumpkin Pancake-31

Love and greens,

Keren x

The Perfect Tofu Scramble

Tofu Scramble-11

At one point, I believe that most vegans will crave scrambled egg. They will either make peace with never having scrambled egg ever again or (my crowd) they will try the vegan tofu way.

Truth is, though it doesn’t taste exactly like scrambled egg, it tastes pretty darn delicious and it certainly hits the spot!

Tofu Scramble-14

The secrets to making a perfect tofu scramble, I believe comes down to two things;

  1. Using hard firm tofu and removing as much liquid from it so it doesn’t go soggy and
  2. Adding spices to lift the flavour profile of tofu, which doesn’t taste much like anything on its own

This is my number one recipe for tofu scramble and the great thing about it is that you can use any veggies you have in the fridge. My favourite is mushroom and spinach. I think they make the perfect tofu scramble.

Why I love it:

Apart from the fact that it looks like scramble egg and tasty, it tastes kinda egg-y (especially when served with kala-namak), comforting and satisfying. The addition of nutritional yeast gives it a mild cheesy flavour as well as a yellow tinge (also from the turmeric) similar to the colour of scrambled egg.

This tofu scramble is loaded with protein (about 30g per serving). It is rich in fibre as well as other essential minerals such as iron, magnesium, phosphorus, copper and selenium. You’ll also get a dose of antioxidants, anticancer phytonutrients, and immune boosters from the cumin and turmeric combo. It’s a high protein, low carb, low fat meal which contains zero cholesterol. It’s a perfect breakfast for champions!

Tofu Scramble


The Perfect Tofu Scramble
Recipe Type: Breakfast

Author: Keren


Prep time:
Cook time:
Total time:
Serves: 2
Ingredients
  • Tofu Scramble and filling
  • 450g of hard firm tofu
  • 1 tablespoon of olive oil
  • 4 garlic cloves, diced
  • 1 cup baby spinach
  • 1 cup button mushroom, sliced
  • Seasoning
  • 1 tablespoon soy sauce
  • 1/2 tsp garlic powder
  • 1/2 tsp cumin powder
  • 1/4 tsp turmeric powder
  • 3 tablespoon nutritional yeast
  • a pinch of kala namak/ black salt (optional but highly recommended)
Instructions
  1. Drain excess water off of tofu and let it sit on a clean cloth or paper towel for about 5 minutes to absorb excess moisture.
  2. Using a non-stick frying pan, heat olive oil over medium heat. Add garlic and cook for about one minute or until soft.
  3. Using your hands, crumble the tofu into the pan. If the tofu starts giving up a lot of water, increase the heat a little to dry off the water.
  4. Add the soy sauce, mushroom, onion, chilli, cumin and turmeric powder and cook until the mushrooms are tender, stirring every so often.
  5. Serve with some toasted bread or steamed veggies.
  6. Add the baby spinach then turn the heat off. Stir for about a minute until the spinach is wilted.
  7. Add the nutritional yeast. Taste and adjust seasoning if required. Sprinkle with a little kala namak and freshly cracked pepper and serve.
Notes
1. Replace spinach with kale or any other greens you like diced asparagus, spring beans, or even peas and corns.[br]2. Add a splash of non-dairy milk for a creamier scramble.[br]3. Add some shredded dairy-free cheese for a cheesy twist.

Did you make this recipe?

Please let me know how it turned out for you! Leave a comment below and/or share a picture on Instagram with the hashtag #littlegreenhabits.

Love and greens,

Keren 

Tofu Scramble-12


Avocado Chocolate Ice Cream

Hmmmm…avocado chocolate ice cream. The idea for this recipe came from an incident where I accidentally defrosted my avocados from the freezer. Instead of re-freezing it I thought, why not make something with it!

Why I love it:

It’s nutritious, delicious and vegan. A clean snack alternative without any refined sugar or added thickeners, which are normally found in commercial ice cream. Who doesn’t love a good old chocolate ice cream??

Avocado is an excellent source of good fat, which supports healthy heart function. Cacao powder contains a high amount of antioxidants and well… it’s chocolate.

It’s incredibly easy to make. Just blend all the ingredients and then churn using an ice cream maker. I use Cuisine Art 2 Litre Ice Cream Maker but you can probably fit it in a 1.5 Litre ice cream maker.


Avocado Chocolate Ice Cream
Recipe Type: Dessert
Author: Keren
Prep time:
Total time:
Serves: about 1.2 litre
Ingredients
  • 2 cups of mashed avocados
  • 2 cups of coconut cream
  • ½ cup cacao powder
  • ½ cup rice malt syrup
  • ¼ cup dark choc bits (optional)
  • 1 tsp vanilla extract a pinch of salt (optional but highly recommended)
Instructions
Cuisine Companion Method:
  1. Blend using ultra blade for 30 second speed 8.
  1. Churn using a prepared ice cream maker.
  1. Add choc bits if using. Freeze for at least 4 hours.
  1. Let sit for 10-15 minutes at room temperature before scooping the ice cream.
Using Power Blender or Food Processor:
  1. Blend or process all ingredients together until smooth.
  1. Add choc bits if using and mix with using a large spoon.
  1. Churn using a prepared ice cream maker.
  1. Freeze for at least 4 hours.
  1. Let sit for 10-15 minutes at room temperature before scooping the ice cream.
Notes
Instead of Avocado Chocolate Ice Cream you can convert the recipe to Avocado Chocolate Pudding by putting the avocado choc mix in ramekins and then chill it in the fridge for at least 4 hours.

Did you make this recipe?

Please let me know if you had go making this. I love to see your marvelous creations! Leave a comment below and/or share a picture on Instagram with and tag @passionatelykeren :)

Love and greens,

Keren

Sweet Potato Vegan Donuts

Sweet Potato Vegan Donuts

These vegan donuts were inspired by my recent trip to Melbourne where I had the most amazing donuts (or ‘bronuts‘ as they call them) from Mr. Nice Guy’s Bake Shop in Ascot Vale. They were mind-blowingly delicious: soft, fluffy and sweet. They tasted so heavenly and were a complete and utter indulgence. Coming back to Sydney, I couldn’t help but wonder if I could make my own vegan donuts. I wanted them to be tender and tasty, but healthier, and baked, not fried as in Melbourne. And so after a few experiments in the kitchen, these donuts were born.

Why I love them:

One thing I love about these vegan donuts is how long they stay tender and moist after baking. I’ve made deep fried donuts in the past and they start tasting a bit dry and hard even after just a few hours. These donuts, on the other hand, stay tender and moist for many hours to a few days – you just need to warm them up, with 15 seconds for each in the microwave if they get a bit cold.

They also quite easy to make. I’ve made them both by hand and using Cuisine Companion (CC). I’d use my CC when I make a double batch or being super lazy but really, it’s so easy to make. There’s no kneading involved so the process is fairly simple.

Sweet potatoes are an excellent source of vitamin A and vitamin C and rich in fibre and potassium. They’re baked, not fried, and they smell like Christmas morning.

Sweet Potato Vegan Donuts

Sweet Potato Vegan Donuts

Sweet Potato Vegan Donuts

Makes 40 small size donuts

  • 1 package (1/4 ounce) active dry yeast
  • 1 cup warm non-dairy milk
  • 1 tbsp vinegar or lemon juice
  • 1 1/2 cups warm mashed sweet potatoes
  • 1/3 cup coconut oil, melted
  • 1 cup raw sugar (*see notes)
  • 4 tsp baking powder
  • 1-1/2 tsp baking soda
  • 1 tsp salt
  • 1 tsp ground nutmeg
  • 6 cups plain or wholemeal flour
  • 1/2 tsp ground cinnamon

Vegan eggs (equivalent of 3 eggs)

Directions – Cuisine Companion

  1. Make vegan eggs: mix 3 egg replacers with 6 tbsp water and whisk until foamy with a fork.
  2. Mix your non-dairy milk with vinegar. Add yeast and 1 tbsp of sugar, mix to dissolve.
  3. Prepare the CC bowl with the kneading blade. Add mashed sweet potatoes, coconut oil, the remaining sugar, baking powder, baking soda, salt, nutmeg and half of the flour into the bowl. Mix at speed 7 for 15 seconds.
  4. Stir in the remaining flour and mix at speed 7 for about 20- 30 seconds, just enough to form soft dough. You may not need to use all the flour. Cover and let sit at room temperature for 1 hour.
  5. Turn onto a floured surface; divide into four equal portions.
  6. Roll each portion to 1 cm thickness. Cut with a doughnut cutter. Bake at 170C for 10-15 minutes, turning halfway for even cooking.

Directions – Manual

  1. Make vegan eggs: mix 3 egg replacers with 6 tbsp water and whisk until foamy with a fork.
  2. In a large bowl, mix your non-dairy milk with vinegar. Add yeast and 1 tbsp of sugar, mix to dissolve.
  3. Add mashed sweet potatoes, coconut oil, and mix.
  4. Add the remaining sugar, baking powder, baking soda, salt, nutmeg and half of the flour. Beat until smooth.
  5. Stir in the remaining flour just enough to form soft dough. You may not need to use it all. Do not knead. Cover and let sit at room temperature for 1 hour.
  6. Turn onto a floured surface; divide into four equal portions.
  7. Roll each portion to 1 cm thickness. Cut with a doughnut cutter. Bake at 170C for 10-15 minutes, turning halfway for even cooking.

Notes and Tips:

  1. You can use white potatoes in place of sweet potatoes.
  2. If you don’t have a donut cutter, improvise with using the lid of a mason jar and the end of a funnel for cutting the holes.
  3. For healthier alternative you can replace raw sugar with coconut sugar, or you can also use 1/3 cup of Xylitol which has the sweetness of a cup of sugar with one-third of the calories

Sweet Potato Vegan Donuts

Did you make these vegan donuts?

Please let me know how it turned out for you! Leave a comment below and/or share a picture on Instagram with the hashtag #littlegreenhabits.

Love and greens,

Keren

How To Make a Vegan Omelette

Vegan omelette-49

One of the things I love about plantbased cooking is how creative it is. I mean, who would have thought you can make omelette without egg? As the saying goes, creativity often stems from scarcity. I think it’s true. Take away meat, egg, butter and cheese, and most cooks (and chefs) would be scratching their head when it comes to cooking. Hence the perception that plantbased food is boring and plain. This recipe breaks all the conventional cooking rules and it’s tasty, egg-y, healthy and of course, 100% vegan.

Why I love it:

Though it doesn’t taste exactly like egg omelette, the texture is very close and the complexity of flavour is on point. The addition of kala namak or black salt gives it an egg-y punch. The high sulphur content of kala namak gives it the distinct smell and taste of egg. Who would have thought that salt can taste and smell like egg! Such is the wonder of Mother Nature. You can get kala namak at most health food stores.

It’s low in fat, and contains zero cholesterol. Chickpeas are rich in soluble and insoluble fiber, folate, and magnesium. It’s also a good source of iron and the immune-boosting zinc and copper.

How to make vegan omelette

Tips for making the perfect vegan omelette:

  1. Cook the batter thoroughly. You don’t want runny, uncooked batter. Use a pan with a lid (aluminium foil works too if you have no lid) so you can cook the batter thoroughly.
  2. Use kala namak and nutritional yeast to get that ‘eggy’ taste
  3. Add red onion and non-dairy cheese for savoury, cheesy flavour
  4. Fill with mushroom and spinach to make a big breakfast omelette
  5. Do not overfill as it will make the batter too runny and you’ll end up with scrambled egg instead of omelette. May not be a bad thing.
  6. Serve with some avocado for added creaminess, and some Kinda Bacon for crunch and bacon-y boost.

Omelette anyone?

Vegan omelette-51


Vegan Omelette
Recipe Type: Breakfast
Author: Keren
Prep time:
Cook time:
Total time:
Serves: 2
Ingredients
  • 1 cup chickpeas, flour
  • 1 cup non dairy milk
  • 2 tbsp apple cider vinegar
  • ¼ tsp baking soda
  • ¼ tsp onion powder
  • ¼ tsp garlic powder
  • ¼ tsp kala namak (black salt)
  • 2 tsp nutritional yeast
  • ½ tsp salt
  • 3 Tbsp of you favourite filling (optional)
Instructions
  1. Prepare Cuisine Companion (CC) bowl with mixing blade.
  2. Add all ingredients into CC bowl and mix at speed 10 for 60 seconds until mixed through. Scraping the sides of the bowl if required.
  3. Heat a non stick pan, on low heat
  4. Pour ¼ cup batter, cook for 2 minutes and then close the lid and cook for another minute
  5. Add your filling if using
  6. Fold and cook for another 2 minutes until it’s cooked
  7. Sprinkle with some freshly ground pepper and kala namak and serve with some tomato sauce
Notes
I use my trusted Cuisine Companion for this recipe as I often make them double or triple the batch size. If you don’t have a Cuisine Companion, get one :D, or you can blend all the ingredients in a blender.

Did you make this recipe?

Please let me know how it turned out for you! Leave a comment below or share a picture on Instagram. I’d love to see it.

Vegan omelette-57


Vegan Bolognaise With Walnut And Mushroom

Spaghetti bolognaise is one of my favourite childhood comfort foods. It wasn’t something that our family would eat regularly so growing up, it would be a real treat for me whenever we went out to have spaghetti bolognaise!

I also owe my English language skills to this lovely dish. During my teens, I was studying English at an International College which ran classes on weeknights and on the weekend. It has a cafe that served spaghetti bolognaise amongst a list of Western dishes they had on their menu. There were times when I was tired and didn’t feel like going to class but I would go anyway as I didn’t want to miss out of having spaghetti bolognaise for lunch or dinner after class. It was a great motivator to study English!

Though this vegan bolognaise recipe is miles different to what I had then but it’s delicious just the same. It’s meaty, without having any actual meat in the ingredients, fragrant, mildly spicy and very, very comforting.


Vegan bolognaise sauce

vegan-spaghetti-bolognaise-9

Why I love it:

This dish brings me back to my childhood. I love the aroma and the tast of fresh basil cutting through the richness of the sauce. I love the chewiness and the meatiness of the mushrooms and the walnuts.  And I especially love trying to gently slurp the spaghetti strands from the bowl and attempting to make as little mess all over the chair and the floor. It never works but hey, one can try.

It’s meatless but it’s full of flavour and satisfying . It’s simple to make, delicious and satisfying. It’s also healthy and nutritious.

  • Walnuts are rich in omega-3 which is essential for normal brain function. They are also rich in alpha-linolenic acid (ALA), which is known to help lower “bad” cholesterol and reduce inflammation and oxidative stress. A study has also found that walnuts contains melatonin, which helps with sleep regulation, circadian rhythms and light-dark adjustment.
  • Mushrooms are not only a great meat replacement it’s also great for weight management. They’re very low in saturated fat and cholesterol and also are a good source of protein and folate which supports your brain and nervous system. They are also critical for red blood cell production (folate, iron, copper, vitamin B12, and vitamin B6, are necessary for the production of red blood cells) as well as supporting reproductive health in women.

Vegan bolognaise sauce


Vegan Bolognaise With Walnut And Mushroom
Recipe Type: Main
Author: Keren
Prep time:
Cook time:
Total time:
Serves: 4
Ingredients
  • 5 cloves garlic, chopped
  • 1 large onion, chopped
  • 140 ml tomato paste
  • 4 vine ripe tomatoes, chopped
  • 2 carrots, dice into small squares
  • 350 g Swiss Brown mushroom, sliced
  • 1 ½ cup walnut, finely chopped
  • 2 fresh chilli, chopped
  • 2 cups of water
  • 1 ½ tsp salt
  • 1 tsp freshly ground pepper
  • 2 tablespoon olive oil
  • 1 cup fresh basil leaves
Instructions
  1. Process walnut in a food processor or chop using a knife to a rough crumb
  2. Heat olive oil in a large pan under medium heat. Fry onion for about 2-3 minutes until fragrant and soft.
  3. Add garlic and cook for another 2 minutes.
  4. Add tomato, tomato paste, carrot, walnut, water and chilli.
  5. Simmer for 1 hour until the sauce thick and rich
  6. Add salt and pepper, taste and adjust seasoning if necessary.
  7. Add mushroom and cook for about 2 minutes,
  8. Turn the heat off, add basil leaves and pour over freshly cooked pasta.

Notes and Tips:

  • For low carb alternative, you can replace the pasta with zucchini noodles by slicing the zucchini into thin strips using a knife, a mandolin or a spiraliser. Toss the zucchini in a pan over a medium heat for 1 – 2  minutes to warm it up.
  • Add 1/2 cup of kalamata olives in place of salt
  • Replace 1 cup of water with 1 cup of red wine
  • Add a teaspoon of dried oregano or mixed dried Italian herbs instead of basil

Did you make this recipe?

Please let me know how it turned out for you! Leave a comment below and/or share a picture on Instagram and tag me so I can see your creation


Keren x


Kale, brown rice and bean salad

Kale Bean Salad-2

I like 15-minute meals. Some days, 15 minutes is all I have to prepare a meal. Other days, 15 minutes is all I’m willing to spend in the kitchen.

Last weekend was one of those times where, either I’d make something very quickly or we’d go out for lunch. I chose the former. This salad took me 15 minutes to make using kale, brown rice, and beans as the main ingredients. Since I had leftover cooked brown rice I didn’t need to cook the rice.  If you need to cook your rice, add about 30 minutes to your cooking time. You can buy instant pre-cooked brown rice from the supermarket or do what I do, make a large batch of rice in advance and then freeze them. They keep for about 3 months in the freezer and it takes about 2-3 minutes to defrost in the microwave.

Why I love this salad

This kale, brown rice and bean salad not only easy to make, but it is also nutritious, delicious, and satisfying. It’s very ‘hands on’: you start by ‘massaging’ kale with a bit of oil to break down the fibrous structure of kale, making it softer and more palatable (i.e. so it won’t taste like grass). Then you just add the remaining ingredients, toss around for a bit and voila, the meal is served.

Kale is rich in antioxidants, anti-inflammatory benefits, cancer-preventative compounds, cholesterol lowering properties, vitamins and minerals. It’s low in calories (a cup of fresh kale has only about 40 calories) and rich in insoluble fibre which is good for digestion. Beans are an excellent source of antioxidants, complex carbohydrates, and soluble fibres. They help maintain your blood sugar levels, keep you full for longer, and are a great source of plant-based protein. Nutritional medicine not your thing? Just eat this, your body will thank you.

Easy kale, rice, and bean salad


Kale, Brown Rice and Bean Salad
Recipe Type: Salad
Author: Keren
Prep time:
Total time:
Serves: 2
Ingredients
  • 1 can of 4 beans mix, rinsed and drained
  • 2 cups of cooked brown rice
  • 2 large tomatoes diced
  • 1 ripe avocado, flesh removed and diced
  • 3 cups of kale leaves, stem removed
  • Sea salt and freshly ground pepper
  • Juice from half lemon
  • 2 tbsp. of olive oil
Instructions
  1. Place shredded kale leave in a large bowl.
  2. Add 1 tbsp of olive oil and gently massage the kale with your hand (just like kneading bread dough) for about 2 minutes or until the leaves are softened.
  3. Add rice, beans, tomato and avocado into the bowl.
  4. Drizzle with olive oil and lemon juice. Gently toss to mix.
  5. Season with salt and pepper and serve.

Did you make this recipe?

Please let me know how it turned out for you! Leave a comment below and/or share a picture on Instagram and tag me so I can see you creation.

Love and greens, 

Keren x