Udon Noodle Stir Fry With Oyster Mushroom

I’ve realised that apart from my Superhero Fried Rice, I have not shared a single stir fry recipe on this blog. That comes as a shock to me, especially considering that I cook stir fry every week! Well, today we will change that.

This recipe makes enough for four servings, which is great for meal prep, or if you like to eat leftovers like I do. Feel free to use other types of mushrooms, add tofu, other veggies, etc. As long as you keep the proportion somewhat the same, you should be alright :)

Udon Noodle Stir Fry With Oyster Mushroom

Easy and hearty stir-fry made with chewy Udon noodles and delicious oyster mushroom

  • 2 tablespoons coconut oil
  • 1 red onion (diced)
  • 5 garlic cloves (finely chopped)
  • 1 long red chilli (sliced)
  • 1 broccoli (cut into florets)
  • 2 carrots (sliced)
  • 400 g oyster mushrooms
  • 1/4 cup vegetarian oyster sauce
  • 1 tbsp light soy sauce
  • 2 packet of udon noodles
  • 1 tsp sesame oil
  • Ground pepper
  1. Heat oil in a wok over high heat. Add onion. Stir-fry for a couple of minutes or until softened. Add garlic and chilli. Stir-fry for another minute until garlic is fragrant.
  2. Add broccoli florets and carrot slices then add vegetarian oyster sauce and soy sauce. Stir-fry for two minutes until the vegetables are just tender.
  3. Add the Udon noodles and toss using tongs for 1-2 minutes or until heated through.
  4. Remove from heat and drizzle with sesame oil.
  5. Add a pinch pepper, taste and adjust seasoning.
  6. Serve with chopped fresh chili.

If you make this, I’d love to hear from you. Leave a comment below or find me on Instagram and share your creation. Don’t forget to tag me @passionatelykeren so I won’t miss your post.

Keren x

The Chocolate Yogi - Oscar Bar

Eat Chocolate, Save Orangutans

Have you heard?

The Chocolate Yogi is running a competition where you can win a year’s worth of vegan chocolateThat’s a lot of belly-filling chocolate!

The Chocolate Yogi - Oscar Bar

For those who came in late, The Chocolate Yogi is a Vegan Chocolate Company and Social Enterprise in Australia with a mission to change the world, one healthy chocolate bar at a time.

They currently donate 10 cents from every bar sold to Sea Shepherd to protect whales in the Southern Ocean, and have raised over 10,000 dollars for that cause in the past six months.

And now they’re supporting another charity that is very close to my heart, The Orangutan Project. The Orangutan Project is a charity with a mission to ensure the survival of both Sumatran and Bornean Orangutan species in their natural habitat.

They purchase tracts of rainforest land in Sumatra and Borneo, in Indonesia, for the purpose of protecting the forest and running Orangutan Sanctuaries for orphaned and injured Orangutans affected by the Palm Oil Industry.

Being born and raised in Indonesia I’m very well aware of the destruction the Palm Tree business has on Orangutans. Six thousand Orangutans are killed every year! The Orangutan Project has been working hard to prevent the extinction of this vulnerable species and halt the destruction of their habitat.

[embedyt] https://www.youtube.com/watch?v=5atm_6xjBC0[/embedyt]

Now the team at The Chocolate Yogi want to raise at least $30,000 for the Orangutan Project in the next 12 months, to help fund the purchase and protection of more land.  With $30,000 they can purchase 100,000 hectares of land!

And this is where you come in!  The Chocolate Yogi has launched The Orangutan Project Fundraising Competition starting from this 1st September.

They’ve released a mini Orangutan chocolate bar (about the size of Frogs chocolate bar if you’re familiar with those) and they will be donating 5 cents from every bar sold to The Orangutan Project.

The Chocolate Yogi - Oscar Bar

The Chocolate Yogi - Oscar Bar

The competition will run for 8 weeks, and they want you to spread the word for this project and put yourself in the running to win a year’s worth of chocolate. All you need to do is:

  1. Take a selfie with the Oscar Orangutan bar(s) and post it to Facebook or Instagram.
  2. Tag and follow @thechocolateyogi
  3. Tag the photo with #Orangutanselfie to enter to win a year’s worth of vegan chocolate. The photo with the most votes/likes wins.

That’s it! Now get yourself some chocolate and start saving Orangutans.

The Chocolate Yogi - Oscar Bar

Keren x

Self Care. And why you should do it.

I’m a natural-born people pleaser.

I have always sought to please others: doing things to help them out and to impress them. To make them like me.

But as I became more and more overwhelmed doing things for other people and not having enough time to look after myself, I realised something.

At the end of the day, no one really cares about you.

I know this sounds negative but hear me out. What I’m trying to say is that no one can care about you as much as you yourself do.

Sure you’ve got your parents, friends, and partners who love you and are always happy to help you from time to time. But the truth is, you’re never at the top of anyone else’s minds, whether it’s friends, family or otherwise.

If you don’t put your own well-being and happiness before others, no one else will.

How much time do you spend on you?

How often do we block time in the calendar for ourselves? We fill our schedules with work and meetings but we hardly think that we are important enough to dedicate time to ourselves in our own schedules.

If you don’t fill your time with your own priorities, others will fill it in for you.

And I’ve been there. Overwhelmed and burnt out, busy as hell and yet I felt like I’ve accomplished nothing. All those times I was living for others, I had forgotten about me, and what’s really important for myself.

And so I started saying no to others, and started saying “yes” more often to myself.

“Yes” to making time to eat well, to exercising, to meditating, to taking long walks at the beach, to getting massages, to journaling, and, above all, to spending time with myself.

Self-care is not selfish

I believe that caring for yourself is extremely important for our health, happiness and productivity.

Self-care is about putting yourself first but it is not at all selfish. It’s about identifying your own physical, emotional and spiritual needs and taking steps to meet them. It is about taking the time to take proper care of yourself and treating yourself as kindly as you try to treat others.

I’m being reminded of this necessity as the pressure of work, life, and business build up. Not just saying no to people and opportunities in order to focus on what’s really important to me, but to stop trying so hard to be the perfect wife, daughter, worker, colleagues, friend, etc., and treating myself with love and care as I do others.

So friends, if you’re feeling overwhelmed and stressed out, take a moment to step back and ask yourself – are you looking after yourself and not just others?

Because if it’s not you, then who? If it’s not now, then when?

Sending you lots of love.

Keren x

Nutty Vegan Choc Bites

Today I want to share a super quick and easy raw vegan chocolate recipe I think you will love. It is my “go to” recipe whenever I’m craving chocolate. It is delicious and very satisfying, chewy and tastes a bit like coconut-rough.  There’s something distinctly nostalgic about these beauties.

This recipe only has six ingredients and requires no cooking. You just need to make sure the coconut oil is in liquid form. If the oil is solid, you will need to heat it slightly either using a small pan over the stove or in the microwave.

I’ve made this a few times, already, using a variety of nuts and sweeteners, and they’ve all worked. Just keep in mind that you will get more fudgy texture when you use syrup or dates as opposed to sugar.

If you’re of the experimental mindset then you’ll love the recipe. It is quite foolproof so feel free to experiment with the sweetener/oat/nut component. Perhaps use desiccated coconut or quinoa flakes, instead of oats, or even a mixture of both. Or use cashews, macadamias or walnuts instead of almonds, or a mixture of your favourite nuts. The sky is the limit.

Nutty Vegan Choc Bites

A super easy and quick recipe for deliciously nutty, raw, vegan, chocolate bites.

  • 1/2 cup cacao powder
  • 1/2 cup coconut oil (melted)
  • 1/4 cup of your favourite sweetener (coconut sugar, coconut nectar, maple syrup, dates, stevia, Natvia, Norbu, etc)
  • 1 cup rolled oats*
  • 1/2 cup raw almonds (or your favourite nuts)
  • 1/4 tsp sea salt
  1. Process the oats, almond, sweetener (maple syrup, coconut sugar or dates) and salt in food processor until crumbly.
  2. Mix melted coconut oil with cacao powder. Add to the oat nut mixture and process again until combined.
  3. Scoop chocolate mixture into silicone mini muffin mould and flatten the surface using the back of a teaspoon. Alternatively, you can also pour into a baking pan (if you use a pan, make sure to cut them into squares before cooling).
  4. Pop in the fridge for at least 20 minutes to set.

You can really creative with this recipe: swap oats with desiccated coconut, rice puffs, or quinoa flakes and use your favourite nuts instead of almond.

If you make this, I’d love to hear from you. Leave a comment below or find me on Instagram and share your creation. Don’t forget to tag me @passionatelykeren so I won’t miss your post.

Keren x

5 Tips On How To Get Rid Of Food Guilt

Guilt: A cognitive or an emotional experience that occurs when a person believes or realizes—accurately or not—that he or she has compromised his or her own standards of conduct or has violated a moral standard and bears significant responsibility for that violation. (source:  Wikipedia)

…..

I used to feel guilty after eating… Maybe not all the time, but a lot of the time

I would feel guilty after eating some chips at a party or some ice-cream after dinner. At one point I even started to feel guilty after eating bread!

It’s a tricky situation because on one hand I knew that I shouldn’t be so harsh on myself. Afterall, I eat fairly well most of the time and I exercise regularly too. But on the other hand I just couldn’t help myself.

So I decided to do something about it.

How t

I mean, as I food blogger I’m continually surrounded by food. I cook them, shoot them, photograph them, talk about them, and eat them. It’s what I love to do.

So I want to, I need to, stop beating myself up everytime I eat something more that a salad or a smoothie. I need to be at peace with myself and with the food I’m eating, whatever it might be.

Though it’s still an ongoing journey for me, I can gladly say that I’ve made huge progress. No more self-loathing and shame after eating, well, most of the time anyway. Occasionally shame creeps in, but I can quickly recognise it’s face and kick it out the door. What’s interesting is that, since I made a conscious effort to stop feeling guilty after eating, I’ve eaten less bad food as a result. Go figure.

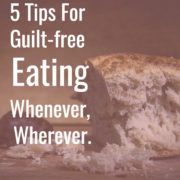
So I thought I should share some of the lessons I’ve learned from overcoming this ‘food guilt’. If you have guilt and shame issue in relation to food (or you know someone who does), this post might be helpful to you. You too can free yourself of shame and self-loathe after eating anything. No complicated formula, just a few simple tips and tricks.

But first, let’s dig down to the root of the problem.

Why do people feel guilty after eating?

I think it all boils down to these two things:

  1. They don’t feel like they deserve or have earned the meal
  2. They ate something they themselves or the society, generally, label as ‘bad’

When you eat something that you haven’t ‘earned’ or think as ‘bad’ food, you feel like you have rebelled against your better judgement and it triggers that feeling of guilt.

On top of that, our parents, TV, and magazines are all telling that we need to ‘watch what we eat’, ‘not eat too much or we’ll get fat’, and we should be ‘good’.

And we know than when they say ‘good’. They don’t just mean being healthy, but also being ‘slim’.

No wonder so many women around the world have food guilt issues!

But here’s the truth. And it is also the reason why I no longer feel guilty after eating, be it a bowl of ice-cream at 11pm or a warm choc chip hot cross bun slathered thickly with vegan butter…hmmm.

The truth is that: Your health is not defined by just one meal. It is defined by everything else you do. Like getting enough sleep for example, or exercising, or if you’re me, spending an hour every Sunday making green smoothies for the week ahead.

Sure there’s always something ‘better’ or ‘healthier’ to eat. But if you’ve already plan on having pizza night with your friends, then you may as well enjoy it. Tomorrow is a new day. The next meal is a new day.

That said, I believe that it also important to know the difference between feeling guilty to feeling ill, bloated or any other adverse physiological reactions your body have on a particular food, in which case you need to stop eating the food in question and consult your doctor!

As for the psychology part, here’s my tips for getting rid of your food guilt. They work for me so they may work for you too.

1. Earn your meal

If you don’t want to feel guilty after a meal, then you need to work for it. Make it a reward for a task, be it exercise, assignment or any task you wish to complete. It’s very simple and yet so effective. Just think of a celebratory lunch or dinner you had after completing an exam or a gruelling project. Did you feel bad after that event? Probably not.

I remember a couple of weeks ago I earned my weekend lunch (a burger and chips) by walking down to the beach (at least twenty minutes’ hustle) to get it, and then walking back uphill after. It felt good. It felt like I’ve earned my lunch and then some.

I also think that all that walking made food taste so much better. You know what they say, the greater the effort the sweeter the reward.

Try it. Next time you want to eat something indulgent, try to earn it and feel the difference.

2. Make it healthier

Most of the time you feel guilty when you’re eating junk food. So why not make it healthier so you can feel better about it?

And you don’t even have to make a massive change. It can be as small as reducing the portion size or making some minor adjustment to the meal.

Take a burger, for example. There’s no reason why you can’t make a burger healthier while still retaining the delicious taste: perhaps swap the burger patties with mushroom, or skip the burger bun, or ditch the dairy and replace it with hummus or avocado instead, or maybe you can simply ask for extra salad.

These changes, although small, can significantly reduce the guilt feeling you have after the meal.

3. Believe in yourself

In other words, follow your own intuition.

Would you believe if I say that when you allow yourself to can eat whatever you feel like, whenever you feel like it, you’ll end up wanting a variety of food, not just the bad stuff?

No? You don’t think you can be trusted? Then answer this question: “What do you normally have for breakfast”?

You know that you can have chocolate cake for breakfast everyday right? No one is preventing you.

The fact that most of us don’t eat chocolate cake everyday proofs that our intuition is working and that we all have the ability to listen to what our bodies needs. We just need to take those intuitions with us and pay more attention to it. Everything we crave is exactly what our bodies need, including that occasional chocolate bar.

4. See food differently

Food can mean so many things to people. But when it comes down to the basic definition of food, it just means sustenance. All the things we eat, we eat them to stay alive.

Though some food may give us more pleasure than basic survival needs, they all have the same purpose, to keep us moving. Just like the air we breathe and the water we drink.

When you see food in this way, you realise that there is no need to feel guilty over an indulgent meal. The energy has been transferred from the food to your body, your body will metabolise it as best it can and prepare itself for the next meal.

Life goes on. You’ll have plenty of opportunity to to nourish your body again, and again.

5. Be grateful

Last and not least, just be grateful.

Instead than feeling guilty after having a delicious dessert, be grateful for what you have – food.

Yes it is a cliché, but it is so for a reason. A lot of people can’t afford food let alone worry about calories, sugar, fat, grains, non-organic ingredients, whatever. Be grateful that you’re here now, able to eat and enjoy food. You’re still alive. Calories can be burned but you can’t re-live your life. So enjoy it.

And if you’re finding it hard to keep a positive mindset, then maybe learning about the Nocebo effect can change your mind.

Have you heard of Nocebo effect? It is essentially the opposite of Placebos. Placebos induce a positive, beneficial effect, Nocebos induce an adverse effect. And it’s all psychological! Cue the song Zombie here… ‘in your head….in your head… zombie.. zombie…zombie..’

So watch those thoughts. Don’t add unnecessary nocebo effects to your bodies. Better yet, embrace the placebo effect and believe that there’s nothing to worry about. And there’s nothing to be ashamed of.

Because there is no shame in enjoying food.

I hope you’ve found this post helpful. With my wedding only three weeks away, this also serves me as reminder as I prepare for the day, to not stress out every time I indulge and eat a cookie here and there.

If you have any food guilt story or tips you wish to share, leave it in the comment below, I’d love to hear from you.

xKeren


Vegan Pear Cake

What could be a better way to rekindle my old love for pears than making a Vegan Pear Cake? I honestly can’t remember the last time I had pears before last week. It could have been six months or even a whole year. They had kinda fallen off my radar until I started painting a few months ago.

Did I tell you I started painting again? It’s been quite a learning process! I will write a post about it one day. Maybe next week.

I actually bought the pears just to use as a model for my still-life painting. But after finishing the painting, I took a bite of the halved pear and, boy oh boy, I had forgotten how heavenly pears taste!

It was tender, juicy and sweet. It almost feels like meeting an old friend again. All the memories of wonderful moments together start to resurface and you wonder ‘how could we ever have lost touch?’

Pear and banana cake

That’s it. For the rest of the season I’m putting pears on my weekly shopping list. It’s a lovely, versatile and easy-to-use fruit and I want to use it more. Be prepared to see some expearimentation on the blog in the near future.

I’m looking forward to it already.

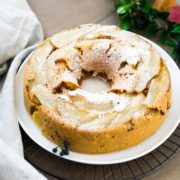
As for this Pear Cake, its very easy to make (you know me… I like easy). Just slice the pears and lay them on the base of the cake tin (I use a bundt tin but a normal tin would be easier to work with). Mix the dry ingredients, blend the wet ingredients, combined the two together, bake and voila, you have yourself a lovely Vegan Pear Cake.

Pear Cake

A cake for all pear lovers out there.

Pears

  • 4 pears

Dry

  • 1 1/2 cup wholemeal flour*
  • 1/2 cup oat flour**
  • 1/2 cup almond meal
  • 3 tsp baking powder
  • 1/2 tsp bicarb soda
  • 1/4 tsp sea salt

Wet

  • 1 1/2 cup soy milk
  • 1 ripe banana
  • 1/2 cup coconut sugar
  • 1/3 cup coconut oil
  • 2 tsp vanilla extract
  • 2 tsp <a href="http://www.beyondlatte.com.au">Beyond Latte</a> (or replaced with 1 tsp ground ginger)
  1. Preheat oven to 180°C fan, and grease the sides and base of a 24 cm cake tin.
  2. Slice one pear thinly and arrange it in the base of the cake tin. Slice or chop the remaining pears into about 1 cm chunks and set aside.
  3. Add almond meal into a large bow. Sift remaining dry ingredients on top and stir to combine.
  4. Blend wet ingredients in the blender. Pour onto dry ingredients and gently stir until just combined.
  5. Fold through pears gently (careful not to over mix), then spoon the mixture into the tin carefully so you (don’t disturb your pear arrangement). Spread the top out flat with a spatula.
  6. Bake for 35-45 minutes until a wooden skewer inserted in the middle comes out clean.
  7. Remove from the oven and leave in the tin for 10 minutes, then turn upside down onto a wire rack and carefully remove the base. Leave to cool before slicing
  8. Serve sprinkled with almond meal and icing sugar if desired. I like to have mine with a dollop of vegan lemon cream cheese.

*You can replace the different flour with plain flour or gluten free flour to make it gluten-free
**You can make oat flours by blending rolled oats in a blender for a few minutes until fine crumb

If you make this, I’d love to hear from you. Leave a comment below or find me on Instagram and share your creation. Don’t forget to tag me @passionatelykeren so I won’t miss your post.

Also, do you have any ideas what I should make with my weekly pear haul? I’d love to hear your thoughts.

Keren x

Pear Cake

Indonesian style Sheperd’s Pie (Pastel Tutup) – Vegan

Indonesian Style Sheperd's Pie (Pastel Tutup) – Vegan

A hearty meal with fragrant spices and delicious plantbased filling

Mashed potato:

  • 500 g potatoes
  • 3 tbsp vegan butter
  • 1/2 tsp ground nutmeg
  • Salt and pepper to season

Filling:

  • 1 large onion (chopped)
  • 250 g pack firm bean curd (finely diced)
  • 2 carrots (finely diced)
  • 1 cup black fungus
  • 100 g dry rice noodles
  • 2 tsp peanut oil
  • 1 vegetable stock cube
  • 1 cup coconut milk
  • 1/2 tsp nutmeg
  • 1/2 tsp five spice powder (optional)
  • 1/2 tsp sea salt
  • 1/2 tsp ground pepper

Vegan Bechamel Sauce

  • 3 tbsp <a href="https://www.passionatelykeren.com.au/glorious-butterless-butter/">vegan butter</a>
  • 2 tbsp plain flour
  • 2 cups soy milk
  • 1/2 tsp nutmeg
  • Black pepper
  • Sea palt

To make the mashed potatoes mixture:

  1. Peel potatoes and cut into large chunks. Cook in a large saucepan of boiling salted water for 20 minutes or tender but not falling apart. Drain. Mash potato with a potato masher or a large spoon until fluffy.

To make the filling:

  1. Soak rice and black fungus with hot water for 5 min until soft.
  2. Cut rice into short strand and chop up the fungus.
  3. Heat oil in a non-stick pan on medium high heat, cook chopped onion until soft and fragrant.
  4. Add in chopped beancurd, and carrots, stir for 2 minutes.
  5. Add stock cube and coconut milk. Bring to boil and simmer until carrots turn soft, around 5 minutes.
  6. Add in black fungus, vermicelli, five spice powder, nutmeg, salt, and pepper. Stir well.
  7. Adjust the taste, bring to boil and then remove from heat and aside to cool for a few minutes.
  8. Pour filling on the pans and let cool slightly (about 5 minutes)
  9. Cover with mashed potato mixture (you can just spoon it on top or use a piping bag like I did).
  10. Bake for 30-40 minutes or until the top is nicely brown. Serve with a good drizzle of vegan bechamel sauce.

To make the Bechamel Sauce

  1. Place oil and flour in a saucepan on medium heat and cook for 5 minutes.
  2. Gradually pour in the soy milk and whisk to prevent lumps. Season with salt, pepper and nutmeg.

If you make this, I’d love to hear from you. Leave a comment below or find me on Instagram and share your creation. Don’t forget to tag me @passionatelykeren so I won’t miss your post.

Keren x

Vegan Apple Pie

Friend, my wedding is now due in less than two months and I still haven’t finished organising it.

Instead, I’ve been procrastibaking. And made this really yummy Vegan Apple Pie.

Because pies make me happy.

Vegan Apple Pie

Don’t be intimidated by the look. At first glance this vegan apple pie looks like a lot of effort. But actually, it is pretty easy to make. The only time consuming part is the slicing and layering the apple slices, which I must say, I’m not very good at. But hey, if I can do it, you can do it too.

The pie crust is also a lot simpler to make than the traditional recipe. There’s no rolling required and because it’s made completely from oatmeal, it also healthier and gluten-free. Doesn’t it look impressive?

Vegan Apple Pie

I think it would taste amazing with a scoop of dairy-free vanilla ice-cream. But, according to the dressmaker, I need to lose one or two kilos to make the dress looks perfect. So no ice-cream for me tonight. At least I can have my pie and eat it too :)

Vegan Apple Pie

Oat Flour Pie Crust

  • 1 1/2 cup oat flour*
  • 2 teaspoon coconut sugar
  • 1/2 teaspoon sea salt
  • 1/4 cup melted coconut oil
  • 5 tbsp cold water

Apple Pie Filling

  • 4-5 Granny Smith apples (peeled and cut into thin slices)
  • 1/3 cup coconut sugar
  • 1 tsp ground cinnamon
  • 1/2 tsp allspice
  • 1/4 tsp nutmeg
  • 1/4 tsp sea salt
  • 1 1/2 tsp fresh lemon juice
  • 1 Tbs melted coconut oil

For the pie crust

  1. In a large bowl, mix together flour, sugar, and salt.
  2. Stir in the melted coconut oil and mix until crumbly.
  3. Add in the cold water to moisten the mixture to form a dough.
  4. Press the dough into a pie pan using your fingers, including the side edges.

For the apple filling

  1. Preheat oven to 180C.
  2. Place apple slices and all the ingredients in a large bowl and gently toss the apples to coat. Let sit for 10 minutes.
  3. Drain the apples through a sieve, reserving the liquid from the marinade.
  4. Simmer the liquid in a small pan until it’s reduced to at least half and becomes somewhat thicker.
  5. Arrange the apple slices in the pie pan, starting from the outside edge of the pan and spiraling towards the center. Insert apple slices into any gaps that you see.
  6. Pour the reduced liquid onto the apple pie leaving 1-2 tablespoons for glazing.
  7. Bake for 35-45 minutes or until the apples are tender and the pie crust is golden brown.
  8. Glaze the pie with the remainder liquid. Allow to cool for at least 10 minutes before serving.

*To make oat flour, blend rolled oat in a blend until it turn into fine crumbs.

If you make this, I’d love to hear from you. Leave a comment below or find me on Instagram and share your creation. Don’t forget to tag me @passionatelykeren so I won’t miss your post.

Keren x

Vegan Apple Pie

Vegan Passionfruit Ice Cream Cups

Today I’m sharing my latest kitchen creation – Vegan Passionfruit Ice Cream Cups. Make this when you need some icy treats, yesterday. 

And yes it’s currently very cold in Sydney and I have no business making ice treats. However, I’m one of those weirdos who love eating ice cream when it’s freezing colds. Why not? The ice cream melts slower and it reminds me of summertime :)

The recipe for this dessert is very simple. You don’t need to cook or churn the batter, just blend and chill. Also, the great thing about making them in little cups is that they defrost a lot quicker and you can just bite straight into them rather than messing around with a scooper. You don’t even need to make the base but it gives a lovely flavour and texture to the ice-cream.

Note: Since the recipe uses coconut cream, you’ll need to do a bit of preparation the night before. Leave one or two cans (use two cans) of coconut milk in the fridge at least overnight. The cooling process will allow for the ‘cream’ to float to the top, which is what we need. You can use the liquid part for smoothies or mix it with coffee to make a nice cold coffee drink.

In this recipe I’m using Norbu – a sweetener made of monk fruit extract. It’s tastes just like sugar but with 96% less calories and none of the bitterness of other sweeteners. I’ve been experimenting with it and I’ve used it in this desert. I love it.

Monk fruit or known by Chinese as ‘luo han guo’ has been around for century and is commonly used by Chinese as medicinal herb for treating cough and sore throat. I still remember my mum making me a cup of this luo han guo tea, whenever I have a sore throat. You can other sweetener if you like such as maple syrup, agave nectar, stevia or even sugar. If you’re using stevia, make sure that you adjust the amount to achieve the sweetness of 2 tablespoons sugar, which is what we need.

Vegan Passionfruit Ice Cream Cups

Bite-size, no churn ice cream recipe perfect for entertaining. Just blend and chill!

  • Base
  • 1/2 cup raw almond
  • 5 pitted medjool dates
  • 1 tbsp coconut flakes (or shredded coconut)
  • 1 tbsp coconut oil
  • a pinch of salt
  • Filling:
  • 1 cup coconut cream (the thick creamy bits from a can of coconut milk left in the fridge overnight)
  • 2 tbsp of your favourite sweetener (I use Norbu)
  • 1 1/2 tbsp lemon juice (about half a lemon)
  • 2 tbsp Passionfruit pulp (plus extras for serving)
  1. Add all the ingredients for the crust into a food processor or a small power blender until a dough forms.
  2. Place about a teaspoon into a mini muffin silicon tray and press down with your fingers to flatten and cover the base. Place in the freezer while you make your ice cream filling.
  3. Blend all the ingredients until is well-combined and smooth. Pour over the base, cover with foil and place back into the freezer for at least 3 hours.
  4. Take out of the freezer and allow to slightly defrost for about 5-10 minutes before eating.

If you make this, I’d love to hear from you. Leave a comment below or find me on Instagram and share your creation. Don’t forget to tag me @passionatelykeren so I won’t miss your post.

Keren x

Vegan Carrot Cake

Well hello, I have a delicious vegan carrot cake recipe for you. It’s simple, easy to make, and most importantly, it’s yum.


Vegan baking can be a bit of a hit and miss. When it’s a miss (a.k.a #fail) it can be devastating. Especially when you use expensive organic ingredients which I often do.

Luckily, I have been having more luck than misfortune at baking this year. This cake is certainly one of my successes. I’ve made them three times in a row now and as I look at these photos, I feel like making them again.

Gosh, wedding is in eight weeks and it doesn’t look like I will lose the one to two kilograms needed to make my dress looks ‘perfect’ (said the seamstress…). Thank God for Sphanx!

I cut the cake into halves and frost them with this Lemon Cream Cheese Frosting, which although optional, I highly recommend because it takes the cake to a whole new dimension. I only used about a third of the batch for frosting the cake so you don’t need to make the whole batch. However, because it’s so good (and very light) I ended up serving it with the cake as a side as well.

I also use a teaspoon of Beyond Latte – Ginger Latte Mix for a bit of a ‘ginger kick’. The mix also have turmeric which gives the cake a lovely golden colour. You can replace it with 1/2 teaspoon of ginger powder if you want.

Try this vegan carrot cake you must. It’s delicious.

Vegan Carrot Cake

Easy and delicious vegan carrot cake for everyone!

Wet Ingredients:

  • 2 large carrots (grated (about 277 gram))
  • 1 1/2 cup milk
  • 1/2 cup raw sugar
  • 1/3 cup melted coconut oil
  • 2 tbsp apple cider vinegar
  • 1 tsp vanilla extract

Dry Ingredients:

  • 2 cups flour
  • 2 tsp baking powder
  • 1/2 tsp baking soda
  • 2 tsp ground cinnamon
  • 1 tsp Beyond Latte <a href="http://www.beyondlatte.com.au">Ginger Latte Mix</a> (optional)
  • 1/2 tsp ground nutmeg
  • 1/2 tsp ground clove
  • 1/2 tsp salt
  • 1/2 cup chopped walnut
  • 1/2 cup of <a href="https://www.passionatelykeren.com.au/vegan-lemon-cream-cheese-frosting/">Lemon Cream Cheese Frosting</a>
  1. Preheat oven to 180C. Line a 34 x 24 cm baking pan
  2. In a large bowl, whisk together the dry ingredients.
  3. In a separate bowl, whisk together the wet ingredients.
  4. Mix the dry ingredients into the bowl with the wet ingredients and stir until just combined.
  5. Bake for 30 to 40 minutes or until a toothpick inserted comes out clean. Let cool for 5-10 minutes, then carefully remove them from pan and transfer to a wire rack to cool completely before frosting.

If you’re a super lazy person (like me at times) you can put all the ingredients and pulse them in a blender. You want to be careful though, not to overblend so you still get some texture from the carrots of the nuts.

If you make this, I’d love to hear from you. Leave a comment below or find me on Instagram and share your creation. Don’t forget to tag me @passionatelykeren so I won’t miss your post.

Keren x